
Pyramids of Giza Photography Guide 2026: Expert Tips for Stunning Photos
Photographing the Pyramids of Giza challenges even experienced photographers with intense light, massive scale, and crowded conditions. These ancient monuments deserve technical excellence and creative vision transforming ordinary tourist snapshots into portfolio-quality images. Understanding optimal timing, equipment selection, composition principles, and location-specific techniques separates memorable photographs from forgettable documentation.
Key Takeaways
- Golden Hour Magic: Shoot 6:30-8:30 AM or 4:30-6:30 PM for soft, warm light creating dramatic pyramid shadows and golden limestone tones
- Essential Equipment: Bring wide-angle lenses (16-35mm) for full pyramid scale, telephoto lenses (70-200mm) for detail shots, and sturdy tripods for low-light photography
- Best Viewpoints: Panoramic plateau offers classic three-pyramid alignment, while southeastern desert areas provide unique perspectives avoiding tourist crowds
- Camera Settings: Use f/8-f/11 for landscape sharpness, ISO 100-400 in daylight, shutter speeds 1/125+ to freeze action and minimize blur
- Composition Techniques: Include foreground elements like camels or desert rocks, use leading lines from pathways, apply rule of thirds placing pyramids off-center
- Seasonal Considerations: October-April offers comfortable shooting conditions with clear skies, while May-September brings harsh midday light requiring dawn/dusk timing
Introduction
The pyramids’ monumental scale creates unique photographic challenges. Standard tourist perspectives produce flat, lifeless images failing to convey the structures’ true grandeur and historical significance. Successful pyramid photography requires strategic positioning, creative framing, and technical precision capturing both architectural magnificence and atmospheric desert context. Weather patterns, crowd management, and local regulations further complicate shooting strategies.
This comprehensive guide draws from professional photographers, local experts, and years of successful pyramid shoots. Whether you’re serious photographers with advanced gear or smartphone enthusiasts wanting better vacation photos, these techniques improve your results dramatically. Understanding light quality, composition rules, and practical logistics enables you to create images worthy of the world’s most photographed ancient monuments.
People Also Ask About Pyramids of Giza Photography 2026
What’s the best time of day to photograph the pyramids?
Golden hours 6:30-8:30 AM and 4:30-6:30 PM provide soft, directional light creating dramatic shadows and warm amber tones on limestone. Morning light proves superior offering cooler temperatures, smaller crowds, and haze-free atmospheric conditions. Midday harsh light washes out details and creates unflattering contrasts best avoided for quality photography.
What camera settings should I use for pyramid photography?
Set aperture f/8-f/11 for maximum landscape sharpness, ISO 100-400 in daylight maintaining image quality, and shutter speeds 1/125 or faster preventing motion blur. Use manual mode controlling exposure precisely, or aperture priority mode letting camera adjust shutter speed. Enable RAW capture providing maximum post-processing flexibility for challenging lighting conditions.
Do I need special permits to photograph the pyramids?
Regular photography requires no special permits or additional fees beyond standard entrance tickets. Professional photography with extensive equipment, models, or commercial purposes may require advance permissions from Egyptian antiquities authorities. Tripods sometimes face restrictions during crowded periods though enforcement varies by location and time.
What’s the best lens for pyramid photography?
Wide-angle lenses (16-35mm) capture full pyramid scale and dramatic perspectives, while telephoto lenses (70-200mm) isolate architectural details and compress distant elements. Bring both focal ranges if possible maximizing creative flexibility. Standard zooms (24-70mm) offer versatility though sacrifice extreme wide or telephoto capabilities.
Extended multi-day tours – 5+ days
Featured Giza Multi-Day Tour Packages
3 days
Giza 3-Day Discovery Tour
- ✓ Comprehensive Giza experience
- ✓ Expert local guides included
- ✓ All accommodation included
- ✓ Transportation provided

5 days
Giza 5-Day Highlights Experience
- ✓ Comprehensive Giza experience
- ✓ Expert local guides included
- ✓ All accommodation included
- ✓ Transportation provided

7 days
Giza 7-Day Cultural Journey
- ✓ Comprehensive Giza experience
- ✓ Expert local guides included
- ✓ All accommodation included
- ✓ Transportation provided
10 days
Giza 10-Day Complete Adventure
- ✓ Comprehensive Giza experience
- ✓ Expert local guides included
- ✓ All accommodation included
- ✓ Transportation provided
Multi-day tour packages powered by TourRadar. Prices and availability subject to change.
Understanding Light and Weather
Golden Hour Photography
Morning golden hour (6:30-8:30 AM) delivers exceptional pyramid photography conditions. Low-angle sunlight creates long, dramatic shadows emphasizing architectural details and surface textures invisible under harsh midday illumination. Limestone surfaces glow warm amber and gold, while clear morning air produces sharp, vibrant images free from afternoon heat haze.
Evening golden hour (4:30-6:30 PM depending on season) offers similar quality light though challenges include accumulated atmospheric dust, larger crowds, and intense afternoon heat lingering from midday. However, sunset timing proves more convenient for many photographers than pre-dawn wake-up calls. Winter sunset occurs earlier (4:30-5:30 PM) while summer extends to 6:30-7:30 PM.
Blue hour immediately following sunset (15-30 minutes after sun disappears) creates ethereal twilight conditions with soft, even illumination. Pyramids silhouette against colorful sky gradients ranging from deep blue to purple and pink. These challenging low-light conditions require tripods, longer exposures (1-4 seconds), and careful composition as darkness descends quickly after sunset.
Seasonal Light Characteristics
October through April provides optimal photography weather with clear skies, comfortable temperatures (60-75°F), and lower humidity creating crisp atmospheric conditions. Winter sun maintains moderate intensity throughout the day though golden hours produce the finest light quality. This season delivers consistently excellent shooting conditions justifying its popularity among serious photographers.
May through September challenges photographers with extreme heat (95-105°F), intense midday sun, and significant atmospheric haze reducing image sharpness. Summer photography requires very early morning starts (5:30-6 AM) completing shoots before 9 AM when heat and light quality deteriorate rapidly. Late afternoon shoots begin after 4 PM once temperatures moderate slightly.
Weather Considerations
Cairo experiences minimal rainfall making wet weather photography rare concerns. However, occasional dust storms (khamsin) occur during spring months (March-May) creating dramatic atmospheric conditions but reducing visibility and coating equipment with fine sand. Check weather forecasts adjusting shooting schedules around predicted dust events.
Desert atmospheric conditions create unique photographic effects including heat shimmer during extreme temperatures, sand particles softening distant details, and dramatic cloud formations during transitional weather. These conditions add atmospheric interest when managed properly but can ruin images if ignored during shooting. Monitor weather patterns planning shoots around optimal conditions.
Essential Photography Equipment
Camera Body Requirements
Full-frame cameras provide superior image quality, better low-light performance, and wider dynamic range capturing challenging desert lighting conditions. However, crop-sensor cameras deliver excellent results when used skillfully with appropriate lenses. More important than sensor size is understanding your camera’s capabilities and shooting within its strengths.
Bring backup camera bodies or smartphones as insurance against equipment failure. Cairo’s dust, heat, and intense use challenge camera reliability. Clean sensors and lenses frequently as fine desert sand infiltrates equipment despite careful handling. Weather-sealed cameras offer better dust protection though careful equipment management proves more critical than weather sealing alone.
Lens Selection Strategy
Wide-angle lenses (16-35mm full-frame equivalent) capture pyramid scale and dramatic foreground-to-background relationships. These focal lengths excel at panoramic shots, architectural details, and environmental portraits including pyramids in context. Ultra-wide lenses (14mm and wider) create dramatic perspectives but require careful composition avoiding excessive distortion.
Telephoto lenses (70-200mm) compress perspective making distant pyramids appear larger and closer together. These focal lengths isolate interesting details, capture texture in limestone blocks, and photograph architectural elements invisible to wider lenses. Telephoto compression creates unique compositional opportunities unavailable with wide-angle perspectives.
Standard zoom lenses (24-70mm) offer practical versatility for photographers wanting single-lens solutions. These moderate focal ranges handle most pyramid photography situations adequately though sacrifice extreme wide-angle drama or telephoto compression capabilities. Consider your photographic priorities selecting lenses matching your creative vision.
Support and Accessories
Tripods enable sharp low-light photography during dawn, dusk, and interior shots. Carbon fiber tripods balance stability with lightweight portability across extensive walking distances. However, tripods attract vendor attention and sometimes face restrictions during crowded periods. Monopods provide compromise solutions offering stability while remaining more portable and less restrictive.
Bring multiple memory cards (64GB+ capacity) and backup batteries as intensive shooting drains power quickly. Cairo’s heat accelerates battery discharge requiring more reserves than temperate climate photography. Lens cleaning supplies including microfiber cloths, air blowers, and lens pens maintain optical quality despite ubiquitous desert dust.
Neutral density filters reduce light enabling long exposures creating smooth cloud movement or eliminating tourists through extended time exposure. Polarizing filters enhance sky saturation, reduce reflections, and improve overall contrast. Graduated ND filters balance bright skies with darker foregrounds in high-contrast situations though modern cameras’ dynamic range often eliminates this need.
Best Photography Locations
Panoramic Plateau Viewpoint
The panoramic viewpoint on the plateau’s southeastern edge offers classic three-pyramid alignment shots used in countless publications and travel materials. This elevated position provides sweeping desert views with all major pyramids visible simultaneously. Morning light from the east creates ideal illumination for this perspective making it the single most important location for comprehensive pyramid photography.
Arrive early (7-7:30 AM) securing prime positions before tour buses flood the area after 9 AM. This location experiences heaviest crowding throughout the day as every photographer wants this iconic shot. Use wider focal lengths (16-24mm) capturing all three pyramids, or telephoto lenses isolating individual monuments against desert backgrounds.
Composition tips include incorporating foreground camels or desert rocks adding depth and scale, positioning pyramids off-center following rule of thirds, and waiting for dramatic cloud formations adding sky interest. Low shooting angles emphasize pyramid height while higher perspectives show plateau context better. Experiment with multiple compositions as this location rewards creative exploration.
Great Pyramid Base Perspectives
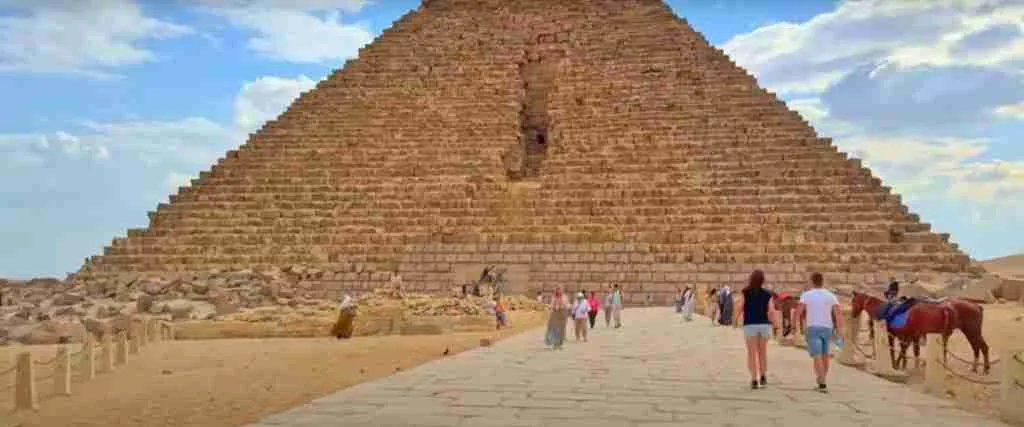
Walking to the Great Pyramid’s base provides dramatic upward perspectives emphasizing scale and architectural precision. Stand close to the structure looking up creates powerful images showing massive limestone blocks and precise construction. Wide-angle lenses (16-24mm) capture full pyramid height from near distances while exaggerating perspective drama.
Photograph individual limestone blocks showing construction details, weathered surfaces, and archaeological marks. These detail shots provide interesting portfolio additions beyond standard wide views. Include people for scale comparison highlighting pyramid monumentality. Morning or afternoon side-lighting enhances texture and three-dimensional form better than flat midday overhead light.
Sphinx and Valley Temple Area
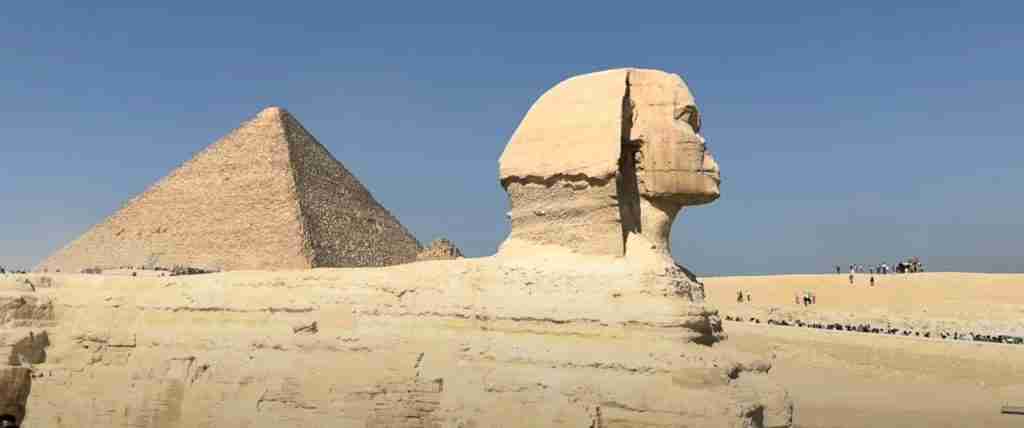
The Sphinx provides instantly recognizable foreground elements for pyramid background compositions. Position yourself showing the Sphinx’s profile with pyramids behind creating layers of Egyptian iconography in single frames. This combination delivers powerful images connecting multiple monument types within unified compositions.
Valley Temple’s massive limestone blocks offer interesting architectural details and textures. Close-up abstract shots focusing on stone patterns, joints, and ancient engineering create compelling images. Wide shots showing temple context within the pyramid complex provide archaeological documentation beyond tourist snapshots. This area proves less crowded than main pyramid locations allowing more relaxed shooting.
Eastern Desert Perspectives
Walk into the desert east of the plateau accessing unique viewpoints avoiding tourist crowds. These locations provide clean backgrounds free from modern intrusions, allowing pyramid isolation against pure desert landscapes. However, leaving official pathways requires appropriate permissions and security awareness. Consult guides about safe exploration boundaries beyond designated tourist areas.
Distance perspectives from eastern desert areas compress pyramids together through telephoto lenses creating unique compositions unavailable from standard viewpoints. Desert foregrounds including rock formations, sand patterns, or sparse vegetation add environmental context. These shots require more effort accessing but deliver distinctive images setting your photography apart from typical tourist photos.
Camera Settings and Techniques
Exposure Triangle Management
Set aperture f/8-f/11 for landscape photography ensuring sharp focus from foreground through distant backgrounds. These middle apertures balance depth of field with optical sharpness avoiding diffraction softness from very small apertures (f/16-f/22). Wider apertures (f/2.8-f/5.6) work for selective focus isolating specific details though landscape photography typically prioritizes comprehensive sharpness.
Use ISO 100-400 in daylight maintaining maximum image quality with minimal noise. Bright desert conditions allow low ISOs producing clean, detailed files perfect for large prints or extensive cropping. Increase ISO to 800-3200 during dawn, dusk, or interior photography when lower light levels require sensitivity boosts. Modern cameras handle higher ISOs well but use lowest values possible for best results.
Shutter speeds 1/125 or faster prevent motion blur from camera shake or subject movement. Use faster speeds (1/250-1/500) for moving subjects like camels, birds, or people. Slower speeds (1/60-1/15) require tripods or excellent handholding technique. Very slow speeds (1 second+) for long exposures require solid tripod support and remote shutter releases eliminating camera shake.
Shooting Modes
Manual mode provides complete creative control over exposure, ideal for experienced photographers understanding exposure triangle relationships. Adjust aperture for depth of field, ISO for sensitivity, and shutter speed for motion control independently. Manual mode excels in consistent lighting conditions where settings remain stable across multiple frames.
Aperture priority mode lets you control depth of field while camera automatically adjusts shutter speed. This semi-automatic mode works well for changing lighting conditions or when you prioritize aperture control over shutter speed. Monitor camera-selected shutter speeds ensuring they remain fast enough preventing motion blur, especially in marginal lighting.
Use exposure compensation (+/- 1-2 stops) fine-tuning automatic exposures. Bright desert sand often fools camera meters underexposing scenes, requiring +1 to +2 stops compensation restoring proper brightness. Dark interiors may need negative compensation preventing overexposure. Review histograms confirming proper exposure rather than trusting LCD screen appearances in bright sunlight.
Focus Techniques
Use single-point autofocus placing focus precisely where you want sharpness. Center focusing point typically offers best performance, though focus-and-recompose technique shifts composition after achieving focus. Back-button focus separates focusing from shutter release providing more control over when focusing occurs.
Manual focus proves useful for precise control in challenging conditions including low light, low contrast subjects, or through fences and barriers. Magnify LCD view checking critical focus before shooting. Hyperfocal distance focusing maximizes depth of field from near foreground through distant backgrounds, ideal for landscape pyramid photography.
Composition and Creative Techniques
Rule of Thirds Application
Position pyramids at rule of thirds intersections rather than dead center creating more dynamic, visually interesting compositions. Place horizon lines on upper or lower thirds rather than bisecting frames horizontally. This classical composition principle adds energy and movement to static architectural subjects.
However, don’t follow rules slavishly. Centered pyramid compositions work well for symmetrical, formal presentations. Experiment with multiple compositions including traditional rule of thirds and centered alternatives. Digital photography’s unlimited “film” enables extensive experimentation at no cost beyond time and storage space.
Foreground Interest
Include foreground elements adding depth, scale, and context to pyramid backgrounds. Desert rocks, camel caravans, architectural fragments, or people provide visual anchors leading viewers’ eyes from front to back through three-dimensional space. Empty foregrounds create flat, uninteresting images failing to exploit photography’s depth potential.
Use wide-angle lenses emphasizing foreground elements while maintaining pyramid presence in backgrounds. Position low to ground exaggerating foreground scale and prominence. Leading lines from pathways, walls, or desert patterns guide viewers’ eyes toward pyramids creating visual journey through frames.
Scale and Perspective
Pyramids’ massive scale proves difficult conveying through photographs. Include people, camels, or vehicles providing size comparison helping viewers understand true monumentality. Position these scale references strategically within frames showing clear pyramid relationships revealing actual dimensions.
Vary shooting heights from ground-level perspectives emphasizing upward pyramid thrust to elevated viewpoints showing plateau context. Move around subjects photographing from multiple angles discovering unique perspectives invisible from standard tourist viewing positions. Creative perspective selection separates exceptional photography from generic documentation.
Abstract and Detail Photography
Capture abstract images focusing on limestone textures, block patterns, shadow plays, or architectural details. These close-up shots provide portfolio variety beyond standard wide pyramid views. Look for interesting light and shadow interactions, weathering patterns, or construction elements creating compelling abstract compositions.
Photograph hieroglyphic inscriptions, carved details, or restoration work documenting archaeological features. These images serve documentary and artistic purposes simultaneously. Use telephoto lenses isolating specific details or macro capabilities capturing extreme close-ups of surfaces and textures.
Smartphone Photography Tips
Maximizing Phone Camera Capabilities
Modern smartphones produce excellent pyramid photographs when used skillfully. Enable HDR mode balancing bright skies with darker foregrounds in high-contrast situations. Use portrait mode creating depth effects though architectural subjects work better with normal modes maintaining comprehensive sharpness.
Avoid digital zoom degrading image quality through interpolation. Instead, move closer to subjects or accept wider compositions cropping in post-processing. Clean phone lenses frequently as dust and fingerprints degrade sharpness significantly. Most phone lenses work best in good lighting struggling with low-light photography compared to larger cameras.
Composition with Phone Cameras
Enable grid overlays helping apply rule of thirds and ensure level horizons. Phone cameras’ wide-angle perspective works well for pyramid photography capturing significant scene coverage. Avoid photographing directly into sun as phone camera flare control proves inferior to larger cameras with lens hoods.
Shoot multiple images from slightly different positions and angles as phone storage enables extensive shooting. Edit photos using built-in or downloaded apps adjusting exposure, contrast, and colors optimizing final results. Phone photography’s instant sharing capability enables real-time social media posting unavailable with traditional cameras.
Interior Pyramid Photography
Technical Challenges
Interior pyramid photography presents extreme low-light challenges with minimal ambient illumination. Flash photography is prohibited protecting ancient surfaces and paintings. High ISOs (3200-12800) enable handheld shooting though image noise becomes significant. Tripods provide sharper results but face restrictions in confined passages.
Use widest apertures (f/2.8 or wider) maximizing light gathering. Stabilize cameras against walls or brace arms firmly minimizing shake during slow shutter speeds. Expose for mid-tone values as extreme contrast between dark interiors and shaft lighting proves challenging. Embrace high ISO noise as unavoidable compromise in these conditions.
Composition in Confined Spaces
Wide-angle lenses prove essential in cramped pyramid passages capturing chamber contexts. Focus on architectural details including corbeled ceilings, massive granite blocks, or passage perspectives leading toward chambers. Include people showing scale and human interaction with ancient spaces.
Look for shaft light penetrating chambers creating dramatic illumination beams. These atmospheric effects add mystery and drama though timing proves critical as sun angles shift throughout the day. Black and white conversion often works well for interior photography emphasizing texture and form over color in monochromatic stone environments.
Post-Processing and Editing
RAW Processing Fundamentals
Shoot RAW format providing maximum editing flexibility recovering highlights, lifting shadows, and adjusting white balance impossible with JPEG files. RAW processors including Adobe Lightroom, Capture One, or free alternatives like Darktable enable comprehensive image optimization.
Adjust exposure correcting under or overexposure within reasonable limits (±2 stops). Recover blown highlights in bright sky areas or lift shadow detail in dark foregrounds. White balance adjustment corrects color casts from mixed lighting or camera auto white balance errors common in desert conditions.
Enhancement Techniques
Increase clarity and texture emphasizing pyramid surface details and limestone block definition. Apply graduated filters darkening bright skies while maintaining proper foreground exposure. Selective adjustments brighten pyramids specifically while maintaining surrounding desert tones.
Adjust contrast creating separation between tonal values for more dramatic presentations. Enhance colors making blue skies richer and golden hour amber more saturated. However, avoid excessive processing creating unrealistic, oversaturated results. Maintain natural appearance while optimizing image impact through subtle refinements.
Advanced Editing
Remove tourists, trash, or modern intrusions using clone stamp or healing tools. While altering documentary accuracy, clean compositions prove more visually appealing for artistic presentations. Stack multiple exposures blending optimal elements from each frame managing dynamic range challenges beyond single exposure capabilities.
Create panoramas stitching multiple vertical shots capturing extreme field of view beyond single lens capabilities. Panoramic processing enables high-resolution, immersive pyramid images perfect for large prints. Black and white conversion emphasizes form, texture, and composition over color potentially distracting from architectural subject matter.
Practical Shooting Logistics
Managing Crowds
Crowds challenge pyramid photography throughout the day. Arrive very early (7-7:30 AM) photographing before tour bus arrivals flood popular locations. Use long exposures (10-30 seconds) on tripods blurring moving people into invisibility while static pyramids remain sharp. This technique requires neutral density filters reducing light for extended exposures in bright conditions.
Shoot from less popular angles avoiding mainstream viewpoints where crowds concentrate. Higher or lower perspectives change visual context making crowd exclusion easier. Embrace crowds as compositional elements showing pyramid tourism scale and contemporary interaction with ancient monuments.
Security and Permissions
Photography for personal use requires no special permissions beyond entrance tickets. Commercial photography, professional equipment, models, or extensive tripod use may require advance permits from Egyptian antiquities authorities. Security personnel sometimes question professional-appearing photographers though polite explanations usually resolve concerns.
Respect “no photography” signs in restricted areas or interior locations where flash might damage artifacts. Ask permission photographing Egyptian people, especially women, respecting cultural sensitivities. Store camera gear securely when not shooting as theft risks exist in crowded tourist areas.
Special Photography Opportunities
Sound and Light Show Photography
Evening sound-and-light shows illuminate pyramids with colored lighting creating unique nighttime photography opportunities. Tripods prove essential for long exposures (1-4 seconds) capturing illuminated monuments. High ISOs (1600-6400) enable handheld shooting though image quality suffers compared to tripod-supported photography.
Position outside official seating areas finding unique angles avoiding crowd interference. Experiment with different exposures balancing illuminated pyramids against evening sky tones. These theatrical lighting conditions prove challenging but reward creative photographers with distinctive images impossible during daylight hours.
Camel Caravan Compositions
Camel caravans crossing desert foregrounds with pyramids behind create iconic Egyptian imagery. Coordinate with camel operators arranging specific positions and movements enhancing compositional interest. These arranged shots feel artificial but produce compelling images combining cultural elements with architectural monuments.
Capture authentic camel moments when tourists ride past pyramids. Use faster shutter speeds (1/250-1/500) freezing camel movement clearly. Silhouette camels against golden hour skies creating graphic profiles recognizable as distinctly Egyptian. These combinations deliver portfolio standouts transcending generic pyramid documentation.
Seasonal Photography Considerations
Winter Photography (December-February)
Winter provides comfortable shooting conditions with temperatures 60-75°F enabling all-day photography. Clear skies and lower humidity produce sharp, vibrant images. However, winter sun angles remain relatively low creating shorter midday harsh light periods. Golden hours occur 6:30-7:30 AM and 4:30-5:30 PM with earlier sunsets than summer.
Summer Photography (June-August)
Summer photography requires dawn starts (5:30-6:30 AM) completing shooting before 9 AM when heat and light quality deteriorate. Midday photography (10 AM-4 PM) proves physically uncomfortable and produces harsh, unflattering light. Resume shooting after 5 PM as temperatures moderate slightly though afternoon heat haze reduces image sharpness.
2026 Updates & Changes
Current Photography Regulations
Standard photography policies remain consistent with personal cameras and smartphones permitted without additional fees. Verify current regulations through official tourism websites before visiting as policies sometimes change. Most restrictions focus on commercial photography and drone use rather than typical tourist photography.
Technology and Techniques
Modern camera technology including computational photography, improved low-light performance, and higher resolution sensors enhance pyramid photography capabilities. Smartphones rival dedicated cameras for many shooting situations though specialized photography benefits from interchangeable lenses and manual controls. Choose equipment matching your skill level and photographic ambitions.
Frequently Asked Questions
Can I bring a tripod to the pyramids?
Tripods are generally permitted though security sometimes restricts their use during crowded periods. Lightweight carbon fiber tripods prove more practical than heavy traditional models given extensive walking. Monopods face fewer restrictions offering compromise between handheld and full tripod stability.
Is drone photography allowed at the pyramids?
Drone photography is prohibited without special permits extremely difficult for tourists to obtain. Security confiscates unauthorized drones and may impose fines. Stick to ground-level photography or book helicopter tours for aerial pyramid perspectives.
What’s better for pyramids: DSLR or mirrorless?
Both camera types produce excellent results. Mirrorless cameras offer lighter weight beneficial during extensive walking though DSLRs provide longer battery life. Choose based on personal preference, existing lens collections, and budget rather than sensor type debates. Photographer skill matters more than equipment specifications.
How do I protect camera gear from desert sand?
Keep gear in sealed bags when not shooting. Clean sensors and lenses frequently using air blowers and microfiber cloths. Avoid changing lenses in dusty conditions whenever possible. Weather-sealed cameras offer better protection but careful handling proves more important than weather sealing alone.
Should I shoot in JPEG or RAW?
Shoot RAW format for maximum editing flexibility though file sizes prove larger requiring more storage. RAW enables exposure correction, white balance adjustment, and shadow/highlight recovery impossible with JPEG. If storage concerns exist, shoot RAW+JPEG getting both options simultaneously.
What editing software works best for pyramid photos?
Adobe Lightroom provides excellent RAW processing, organizing, and editing capabilities. Free alternatives including Darktable or Rawtherapee offer comparable features. Smartphone apps like Snapseed or VSCO enable mobile editing. Choose software matching your budget, skill level, and device preferences.
How do I photograph pyramids with my phone?
Use HDR mode balancing bright skies with darker foregrounds. Clean lenses frequently, enable grid overlays for composition, avoid digital zoom, and shoot extensively. Edit photos using apps optimizing exposure, contrast, and color. Modern phones produce excellent results when used skillfully with attention to composition and lighting.
Can I photograph inside the pyramids?
Interior photography is permitted though extremely challenging with minimal lighting and flash prohibited. Use high ISOs (3200+), wide apertures, and brace camera for stability. Embrace image noise as necessary compromise in these conditions. Tripods face restrictions in confined passages but may be allowed in larger chambers.
What time should I arrive for sunrise photography?
Arrive 45-60 minutes before sunrise (check local sunrise times seasonally). This timing allows finding positions, setting up equipment, and capturing pre-dawn blue hour before sunrise. Sunrise timing varies throughout the year from 5:30 AM in summer to 6:30 AM in winter.
How do I get unique pyramid photos avoiding cliché tourist shots?
Explore less popular viewpoints beyond main tourist areas. Photograph details rather than always showing full pyramids. Use creative perspectives including extreme low angles or telephoto compression. Shoot during golden hours when light quality elevates ordinary compositions. Include environmental context showing pyramids within broader landscape relationships.