
Acropolis Athens Photography Guide 2026: Expert Tips & Best Spots
Photographing the Acropolis Athens in 2026 presents unique challenges and extraordinary opportunities for capturing one of humanity’s most iconic architectural achievements. The Parthenon’s timeless columns, the Erechtheion’s graceful Caryatids, and the dramatic clifftop setting combine to create endless photographic possibilities, from sweeping architectural panoramas to intimate detail studies of 2,500-year-old marble craftsmanship.
Key Takeaways:
- Arrive at 8 AM opening for crowd-free Parthenon photography with optimal morning golden hour lighting
- Use wide-angle lenses (16-35mm) for architectural shots and telephoto (70-200mm) for detail work and compression
- Shoot Parthenon’s eastern facade at sunrise, western facade at sunset for dramatic golden hour illumination
- Filopappou Hill and Areopagus Rock deliver exceptional external Acropolis viewpoints for sunrise and sunset
- Bring neutral density filters for long exposure cloudscapes and polarizers to reduce marble glare
- Plan 5-6 hour photography sessions covering morning golden hour through blue hour for complete portfolio
Introduction
Successful Acropolis photography requires more than just pointing your camera at ancient ruins. Understanding optimal lighting conditions, strategic positioning throughout the day, camera settings for challenging bright marble and deep shadows, and composition techniques that convey the scale and majesty of these UNESCO World Heritage monuments separates forgettable snapshots from portfolio-worthy images that capture the essence of classical Greek architecture.
This comprehensive photography guide provides technical expertise, location intelligence, and timing strategies developed through extensive shooting experience at the Acropolis. Whether you’re a professional photographer seeking award-winning architectural images, an enthusiastic amateur building your travel portfolio, or a smartphone photographer wanting memorable vacation pictures, these expert insights ensure you capture the Acropolis at its photographic finest across all equipment levels and skill sets.
People Also Ask About Acropolis Athens Photography 2026
What’s the best time of day for Acropolis photography?
Golden hour provides optimal Acropolis photography, with sunrise (7:00-8:30 AM) lighting the Parthenon’s eastern facade and sunset (7:00-8:30 PM summer) illuminating the western side. Arrive at 8 AM opening for crowd-free interior shots during morning golden hour when warm light creates dimensional shadows and highlights architectural details.
Can I use a tripod at the Acropolis?
Professional tripods require special permission and are generally prohibited for standard visitors due to crowd management and monument protection concerns. Lightweight travel tripods under 1 meter height may be permitted during off-peak hours, but enforcement varies. Monopods and handheld shooting work best for practical Acropolis photography.
What camera gear should I bring for Acropolis photography?
Bring wide-angle lens (16-35mm) for architectural shots, standard zoom (24-70mm) for versatility, and telephoto (70-200mm) for details and compression. Pack polarizing filter to reduce marble glare, neutral density filters for long exposures, spare batteries, and lens cleaning cloth. Full-frame cameras excel but crop sensors produce excellent results.
Where are the best external viewpoints for photographing the Acropolis?
Filopappou Hill offers superior sunrise and sunset Acropolis views from multiple elevations. Areopagus Rock provides dramatic close-range perspectives, while Anafiotika neighborhood delivers intimate foreground elements. The Acropolis Museum cafe terrace and Hotel Grande Bretagne rooftop showcase elevated urban context views.
Extended multi-day tours – 5+ days
Featured Athens Multi-Day Tour Packages
3 days
Athens 3-Day Discovery Tour
- ✓ Comprehensive Athens experience
- ✓ Expert local guides included
- ✓ All accommodation included
- ✓ Transportation provided
5 days
Athens 5-Day Highlights Experience
- ✓ Comprehensive Athens experience
- ✓ Expert local guides included
- ✓ All accommodation included
- ✓ Transportation provided
7 days
Athens 7-Day Cultural Journey
- ✓ Comprehensive Athens experience
- ✓ Expert local guides included
- ✓ All accommodation included
- ✓ Transportation provided
10 days
Athens 10-Day Complete Adventure
- ✓ Comprehensive Athens experience
- ✓ Expert local guides included
- ✓ All accommodation included
- ✓ Transportation provided
Multi-day tour packages powered by TourRadar. Prices and availability subject to change.
Essential Camera Equipment and Settings
Lens Selection for Architectural Photography
Wide-Angle (16-35mm): The primary workhorse for Acropolis photography, wide-angle lenses capture the Parthenon’s full facade, the Propylaea’s monumental gateway, and sweeping panoramas combining monuments with Athens cityscape. The 16-24mm range works perfectly for interior courtyard shots showing multiple monuments simultaneously. Ultra-wide angles (14mm and below) create dramatic perspectives but introduce distortion requiring careful composition to avoid warped columns.
Standard Zoom (24-70mm): This versatile range handles most photography situations, from partial building facades to visitor-scale environmental shots. The 50mm focal length produces natural perspective matching human vision, ideal for documentary-style Acropolis photography. The 70mm end provides light compression for layering multiple monuments in single frames.
Telephoto (70-200mm): Essential for detail photography of carved metopes, Caryatid faces, and architectural elements inaccessible to visitors. Telephoto compression stacks the Parthenon columns creating dramatic geometric patterns. The shallow depth of field at f/2.8 isolates specific architectural details against softly blurred backgrounds, producing professional portfolio pieces.
Smartphone Photography: Modern smartphones produce excellent Acropolis photographs with proper technique. Use the native wide lens for architectural shots, avoid digital zoom, and shoot in RAW format if available. Third-party apps like ProCamera or Halide provide manual control over exposure, focus, and white balance essential for challenging lighting conditions.
Optimal Camera Settings
Aperture Priority (f/8-f/11): Architectural photography demands front-to-back sharpness. Shoot aperture priority at f/8-f/11 to maintain focus across the entire monument depth while preserving sharp detail throughout the frame. These apertures deliver optimal lens sharpness, avoiding both wide-open softness and diffraction from smaller apertures. Use f/16 only when maximum depth of field is critical.
ISO Management: Start at ISO 100-200 during bright daylight for maximum image quality and dynamic range. Increase to ISO 400-800 during golden hour, and up to ISO 1600-3200 for blue hour photography. Modern cameras handle high ISO cleanly, but prioritize lowest usable ISO for maximum detail retention in architectural photography.
Shutter Speed Considerations: Bright marble requires faster shutter speeds (1/250-1/500) to avoid highlight blow-out in automatic modes. During golden hour, speeds drop to 1/60-1/125, necessitating careful handholding technique or image stabilization. For intentional motion blur of tourists, use shutter priority at 1/15-1/30 while keeping monuments sharp.
White Balance Precision: Avoid auto white balance which struggles with bright marble reflecting blue sky. Set white balance to daylight (5500K) for neutral rendering, or warm it slightly to 6000-6500K for enhanced golden hour tones. Shoot RAW format for maximum white balance flexibility in post-processing.
Essential Filters and Accessories
Circular Polarizing Filter: Crucial for Acropolis photography, polarizers reduce glare from polished marble surfaces, deepen blue skies, and enhance cloud definition. Rotate the filter while observing through the viewfinder to find optimal polarization angle, typically 90 degrees from the sun. The effect dramatically improves midday photography when harsh light creates excessive contrast.
Neutral Density Filters: ND filters enable long exposures (10-30 seconds) during daylight, blurring tourist crowds into ghostly transparent figures while monuments remain sharp. A 3-stop or 6-stop ND allows creative motion blur effects impossible with standard exposures. This technique produces clean, visitor-free Acropolis images despite heavy crowds.
Graduated ND Filters: GND filters balance exposure between bright sky and darker monuments, essential when photographing from external viewpoints with dramatic skylines. The gradient transition preserves highlight detail in clouds while properly exposing the Acropolis structure. Digital graduated filters in post-processing provide similar results with more flexibility.
Remote Shutter Release: While tripods face restrictions, a wireless or cable remote release eliminates camera shake during handheld long exposures braced against walls or columns. This tool proves invaluable during low-light blue hour photography when shutter speeds drop below safe handholding speeds.
Prime Photography Locations and Viewpoints
Interior Acropolis Viewpoints
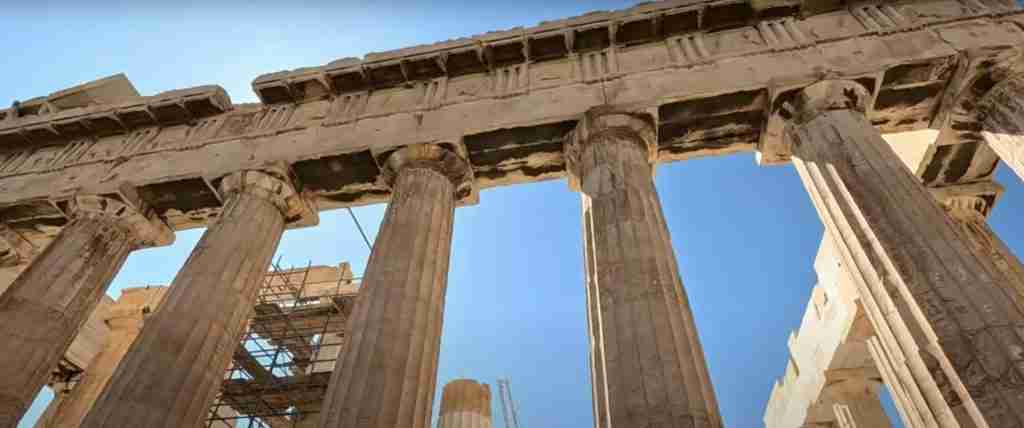
Parthenon Eastern Facade (Sunrise Position): Position yourself 30-40 meters from the eastern entrance for optimal perspective that shows the temple’s full height without extreme distortion. Morning light strikes this facade directly, creating warm tones and dimensional shadows that emphasize the column fluting. Arrive at 8 AM opening to photograph this view without tourists in frame. The eastern side offers less dramatic background than the western city views, but the architecture itself becomes the complete subject.
Parthenon Western Facade (Sunset Position): The western side provides the Acropolis’s most photographed view, combining the temple with sweeping Athens cityscape and distant mountains. Position near the western edge walls for elevated perspectives showing both monument and urban context. Sunset light paints the marble in amber and gold tones while the city below begins its evening illumination, creating magical layered compositions.
Parthenon Southeast Corner: This angle combines the temple’s long side with the corner columns, creating dynamic diagonal compositions. The southeast position works throughout the day as it avoids direct backlight during most hours. Foreground elements like scattered marble fragments add depth and scale to compositions, while the view shows the Parthenon’s sophisticated design from multiple dimensions simultaneously.
Parthenon Northwest Corner (Classic View): The most iconic interior Acropolis perspective, showing the Parthenon’s northwest corner with Athens sprawling behind. This view appears in countless photographs but remains powerful when executed with proper timing and technique. Early morning or late afternoon golden hour elevates this familiar composition from tourist snapshot to professional portfolio piece.
Erechtheion Photography Positions
Porch of Maidens (Caryatids): Photograph the Caryatid porch from the eastern side during morning light when sun illuminates the maiden faces without harsh shadows. Use telephoto lenses (135-200mm) to compress the perspective and isolate individual Caryatids against soft backgrounds. The intricate carved drapery and serene faces deserve close-up detail photography showcasing 5th-century BCE sculptural mastery.
North Porch Columns: The elaborate Ionic columns of the north porch present exceptional detail photography opportunities. Morning light highlights the volute capitals and acanthus leaf decorations. Shoot from various angles to emphasize the three-dimensional carved ornament, using shallow depth of field (f/2.8-f/4) to isolate specific decorative elements.
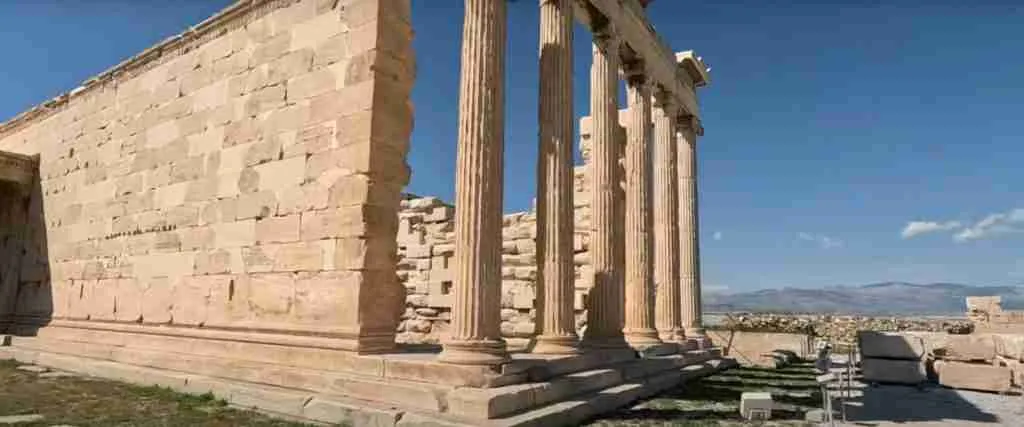
Erechtheion Eastern Facade: This less-photographed perspective shows the temple’s complex asymmetrical design. The eastern facade combines multiple levels and architectural styles, creating interesting compositional challenges. Photograph during morning golden hour when light rakes across the surface, revealing texture and architectural detail through shadow play.
Supporting Monument Viewpoints
Temple of Athena Nike: This small temple on its bastion platform offers dramatic clifftop photography. Shoot from below to emphasize the precarious positioning, or from beside to show the temple against sky with the Propylaea gateway as background. The compact size allows complete coverage with standard lenses while the elevated position provides excellent Athens panoramas.
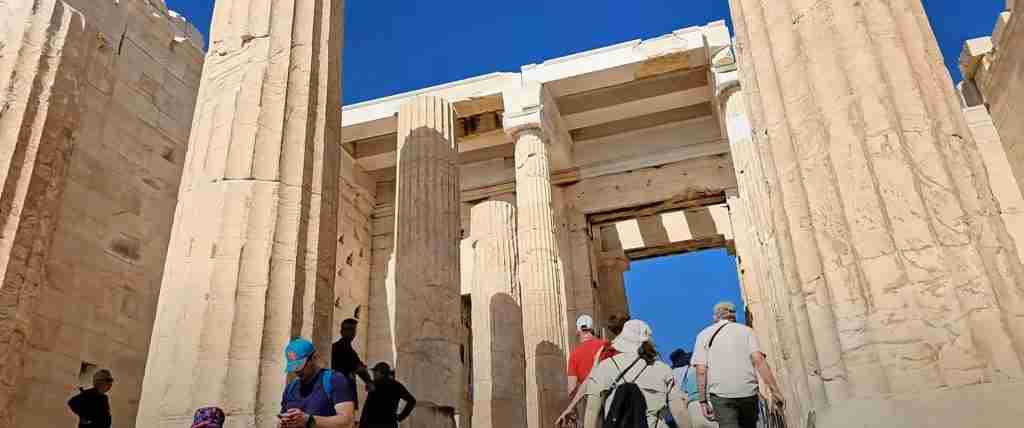
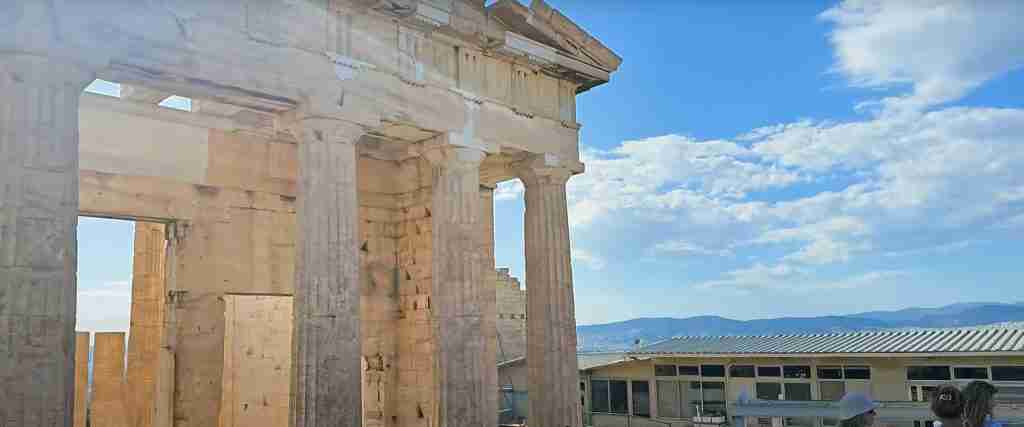
Propylaea Gateway: Photograph the monumental entrance from both western (approach) and eastern (exit) perspectives. The massive Doric columns frame beautifully against blue sky, while the central passageway creates strong leading lines drawing viewers into the composition. Low angle shots emphasize the imposing scale, while elevated positions from the bastion show the gateway’s relationship to surrounding monuments.
Theater of Dionysus: The ancient theater’s curved seating rows create powerful geometric patterns perfect for abstract architectural photography. Shoot from the upper seating levels looking down to emphasize the semicircular design, or from stage level looking up at the dramatic marble tiers. Morning light brings out the warm tones in the weathered stone.
Odeon of Herodes Atticus: This restored Roman theater photographs beautifully from multiple perspectives. The exterior view from the Acropolis summit shows the complete semicircular structure against the Filopappou Hill background. Interior access varies, but when available, shoot the rows of arches and the preserved stage building for unique architectural compositions.
External Viewpoint Masterlist
Filopappou Hill (Premium Location): This pine-covered hill southwest of the Acropolis provides the single best external photography location. Multiple paths and clearings offer varied elevations and perspectives. The summit delivers 360-degree panoramas including the Acropolis, Athens cityscape, Lycabettus Hill, and Saronic Gulf. Arrive 45 minutes before sunrise or sunset to secure prime positions as amateur and professional photographers crowd the best spots during golden hour. The main viewpoint at 147 meters elevation provides unobstructed Acropolis views with dramatic sky as backdrop.
Areopagus Rock (Close-Range Drama): Located immediately northwest of the Acropolis entrance, this rocky outcrop delivers intimate Acropolis perspectives from minimal distance. The low position emphasizes the sacred hill’s imposing height while the close range showcases architectural details. Sunset works brilliantly here as the western light illuminates both the monuments and the rock’s rugged surface. The location gets crowded with sunset watchers, so arrive early to claim prime photography positions.
Anafiotika Neighborhood: The whitewashed houses and narrow staircases of Anafiotika on the Acropolis north slope create charming foreground elements for Acropolis compositions. Photograph from Stratonos Street where traditional Cycladic architecture frames the Parthenon above. Blue-painted doors and windows, bougainvillea flowers, and wandering cats add Mediterranean atmosphere to your Acropolis photography.
Lycabettus Hill (Distant Perspective): This 277-meter hill northeast of the Acropolis offers the most elevated Acropolis viewpoint, showing the entire sacred hill in urban context. Cable car access makes the summit easily reachable. Telephoto lenses (200-400mm) compress the distance, creating dramatic stacked compositions with Acropolis, city, and sea in single frames. Sunset and blue hour photography from Lycabettus produces spectacular results with the illuminated Acropolis glowing against darkening sky.
Philopappos Monument Area: Adjacent to Filopappou Hill summit, the ancient monument provides foreground interest for Acropolis photographs. The carved niches and weathered marble contrast with the pristine Parthenon in the background, creating layered historical narrative. This spot works particularly well during golden hour when warm light illuminates both monuments.
Acropolis Museum Terrace: The museum’s restaurant terrace offers unique elevated Acropolis views through floor-to-ceiling windows. While shooting through glass creates technical challenges, the comfortable indoor setting with food and beverage allows extended photography sessions during midday heat. Clean the glass before shooting and use a polarizing filter to reduce reflections.
Golden Hour Photography Strategies
Sunrise Session (7:00-8:30 AM)
Pre-Opening External Shots (7:00-7:45 AM): Begin photography before the Acropolis opens at Filopappou Hill for sunrise illumination of the eastern Parthenon facade. The warm golden light strikes the marble directly, creating dramatic contrast with cool blue shadows. Position at multiple elevations to capture varied perspectives as light quality changes rapidly during the 45-minute golden hour window.
Opening Time Entry (8:00 AM): Enter immediately at opening to photograph the Parthenon eastern facade during the final minutes of golden hour. The combination of warm light and zero crowds produces the day’s best interior photographs. Work quickly but deliberately, knowing you have approximately 30 minutes before harsh morning light arrives and crowds build.
Erechtheion Morning Light (8:15-8:45 AM): As the sun rises higher, move to the Erechtheion where morning light beautifully illuminates the Caryatid faces and north porch details. The angle of morning sun creates dimensional shadows that emphasize carved details invisible during midday flat light. This window produces the best Caryatid photographs of the entire day.
Morning Strategy Summary: Sunrise photography requires coordination between external and internal positions. Serious photographers might split the session, shooting external views at sunrise, then returning for afternoon sessions. The €30 combo ticket allows re-entry within five days, enabling multi-session photography across optimal lighting conditions.
Sunset Session (6:30-8:30 PM Summer)
Afternoon Positioning (5:00-6:00 PM): Enter the Acropolis mid-afternoon to secure positions for sunset photography. Scout compositions, test camera settings, and identify foreground elements while light remains neutral. This preparation ensures you’re ready when golden hour arrives, avoiding the fumbling that wastes precious minutes of optimal light.
Golden Hour Interior (6:30-7:30 PM): As golden hour begins, the western Parthenon facade receives beautiful warm illumination while Athens cityscape provides context. The combination of architectural photography and urban landscape creates the Acropolis’s most dramatic compositions. Bracket exposures to capture both bright marble highlights and darker city details, merging them later in post-processing for maximum dynamic range.
Blue Hour Extension (7:30-8:00 PM): After sunset, the blue hour provides ethereal light as the sky transitions from golden to deep blue. The Acropolis monuments glow warmly against cooling sky, creating magical atmospheric conditions. Increase ISO to 1600-3200 and open aperture to f/4-f/5.6 to maintain usable shutter speeds while hand-holding. Alternatively, brace against columns or walls for longer exposures.
Illuminated Monument Photography (8:00-8:30 PM): As darkness falls, the Acropolis lighting system illuminates the monuments in warm amber light. This dramatic artificial lighting creates entirely different photographic opportunities from natural daylight. The monuments glow against dark blue sky during late blue hour, producing ethereal compositions impossible during daylight hours.
Optimal Seasonal Photography Windows
Summer Golden Hour (June-August): Summer provides the longest photography windows with sunrise around 6:30 AM and sunset at 8:30 PM. The extended evening golden hour allows leisurely shooting, while the early sunrise enables external photography before the Acropolis opens. However, intense midday heat and harsh overhead light create challenging conditions between 11 AM and 5 PM.
Spring/Fall Golden Hour (April-May, September-October): Shoulder seasons offer ideal photography conditions with moderate temperatures, dramatic cloud formations, and shorter midday harsh-light periods. Sunrise around 7:00 AM and sunset at 7:00 PM provide convenient timing without extremely early wake-ups. The angle of spring and autumn sun creates more dimensional shadows than high summer sun, enhancing architectural details.
Winter Golden Hour (December-February): Winter’s low sun angle produces beautiful raking light that emphasizes texture and relief in carved marble. Sunrise at 7:30 AM and sunset at 5:30 PM compress the shooting day but create more dramatic lighting throughout. Occasional dramatic storm clouds provide spectacular backgrounds for Acropolis photography, though rain risks require weather monitoring and protective equipment.
Advanced Composition Techniques
Architectural Photography Principles
Vertical Line Control: Keep your camera level to maintain vertical lines in Parthenon columns. Tilting upward creates converging verticals that make columns lean inward, distorting the architecture. If upward tilt is necessary, use tilt-shift lenses or correct distortion in post-processing with Lightroom’s guided upright tool or Photoshop’s perspective correction.
Rule of Thirds Application: Position the Parthenon’s horizontal elements (steps, architrave, roof line) along upper or lower third gridlines rather than center frame. Place prominent vertical elements like corner columns at left or right third intersections. This classical composition creates more dynamic, professional images than centered subjects.
Leading Lines: Use the Parthenon’s steps, the Propylaea’s passageway, or the theater’s seating rows as leading lines drawing viewers’ eyes into the composition. These strong geometric elements create depth and visual flow, transforming two-dimensional photographs into three-dimensional spatial experiences.
Framing Devices: Shoot the Parthenon through the Propylaea columns to create natural frames within your composition. This technique adds depth, context, and sophisticated visual layering. Doorways, archways, and column sequences throughout the Acropolis provide endless framing opportunities that elevate basic architectural shots into artful compositions.
Scale and Context Communication
Human Elements for Scale: Include visitors in wide shots to convey the monuments’ massive scale. Position people at architectural elements’ base to show the Parthenon’s 10-meter-tall columns or the Propylaea’s imposing gateway. Wait for visitors to reach compositionally strategic positions rather than randomly capturing crowds.
Environmental Context: Combine Acropolis monuments with Athens cityscape, distant mountains, or Mediterranean sky to show the site’s geographical setting. These environmental elements provide narrative context beyond simple architectural documentation, telling fuller stories about the Acropolis’s commanding position overlooking the ancient and modern city.
Detail Isolation: Alternate between grand architectural views and extreme close-ups of carved metopes, Ionic volutes, or weathered marble texture. This varied perspective creates more interesting photo series than repetitive wide shots. Detail photography showcases the incredible craftsmanship often invisible in wide views, revealing the human artistry behind monumental architecture.
Creative Perspective Techniques
Low Angle Shots: Shoot from ground level looking up to emphasize monumental scale and dramatic geometry. Low angles transform familiar views into powerful compositions showcasing the Parthenon’s imposing presence. This technique works particularly well with wide-angle lenses creating strong perspective distortion that amplifies the architecture’s grandeur.
Elevated Perspectives: Climb to higher points on the Acropolis perimeter for elevated views showing monument relationships and site layout. These overview shots provide geographical context impossible from ground level, showing how different structures relate spatially within the sacred precinct.
Symmetrical Compositions: The Parthenon’s symmetrical design invites centered, balanced compositions emphasizing perfect proportions. While rule of thirds generally applies, symmetrical framing works brilliantly for the Parthenon’s facade, creating powerful, harmonious images celebrating classical architecture’s mathematical precision.
Challenging Lighting Situations
Harsh Midday Light Management
Contrast Control: Midday overhead sun creates extreme contrast between bright marble highlights and deep shadows. Shoot in RAW format and expose for highlights, recovering shadow detail in post-processing where modern cameras retain surprising information. Alternatively, bracket exposures (±2 stops) and merge in HDR for complete dynamic range capture.
Detail Photography Focus: Use harsh midday hours for close-up detail photography where extreme contrast becomes less problematic. Carved decorative elements, inscriptions, and weathered marble texture photograph acceptably under bright even lighting when compositions eliminate challenging sky exposure.
Black and White Conversion: Harsh midday light converts beautifully to black and white photography where extreme contrast becomes dramatic asset rather than technical liability. The Parthenon’s strong geometric forms and deep shadows create powerful monochromatic images emphasizing shape, form, and texture over color.
Backlit Situations
Exposure Compensation: When shooting toward the sun with monuments silhouetted, increase exposure compensation +1 to +2 stops to prevent complete shadow blackout. This technique captures monument outline while accepting blown highlights in bright sky, creating dramatic high-key compositions.
Silhouette Photography: Alternatively, expose for the bright sky to create pure silhouettes of Parthenon columns against golden or blue hour skies. These simplified graphic compositions emphasize iconic shapes rather than architectural details, producing striking minimalist images.
Fill Flash: For foreground subjects (statues, people) backlit against bright sky, use fill flash at -1 to -2 stops to lift shadow detail without obvious flash appearance. This technique balances extreme lighting ratios, maintaining detail in both highlights and shadows.
Overcast Sky Strategies
Even Lighting Advantage: Overcast conditions provide even, soft lighting eliminating harsh shadows and contrast problems. While less dramatic than golden hour, cloudy light reveals subtle details in carved marble and creates moody, atmospheric images. Embrace these conditions for detailed architectural documentation where even lighting ensures consistent exposure across entire monuments.
Dramatic Cloud Photography: Partially cloudy skies with dramatic cloud formations provide spectacular Acropolis backgrounds. Use polarizing filters to deepen blue sky and enhance cloud definition. Expose carefully to maintain detail in both bright clouds and darker monuments, bracketing if necessary for post-processing flexibility.
Post-Processing Workflow
RAW Processing Essentials
Exposure Optimization: Begin with overall exposure adjustment, typically increasing exposure 0.3-0.7 stops for bright marble while protecting highlights. Use histogram to ensure marble highlights don’t clip while shadow areas retain recoverable detail. Modern RAW files contain surprising latitude for both highlight and shadow recovery.
White Balance Correction: Adjust white balance for neutral marble rendering or warm it slightly for golden hour enhancement. The temperature slider controls overall warmth while the tint slider corrects any color casts from reflected sky light. Aim for marble appearing creamy white with slight warmth rather than cool blue or excessively orange.
Contrast and Clarity: Increase contrast moderately (10-20 points) to restore the punch lost from flat RAW files. Add clarity (15-25 points) to emphasize architectural details and marble texture. Avoid excessive clarity creating unrealistic halos around edges, a common amateur mistake.
Vibrance vs Saturation: Use vibrance rather than saturation for subtle color enhancement. Vibrance intelligently boosts muted colors while protecting already saturated tones, preventing unnatural over-saturation. Increase vibrance 15-25 points for natural-looking color enhancement that maintains believable marble tones.
Advanced Adjustments
Graduated Filters: Apply digital graduated filters to balance sky and ground exposure in wide shots combining monuments with cityscape or dramatic skies. Darken bright sky by 0.5-1.0 stops while maintaining or slightly lifting monument exposure, creating more balanced overall presentation.
Radial Filters: Use radial filters to subtly lighten the Parthenon while darkening surrounding areas, drawing viewer attention to the primary subject. This targeted adjustment creates depth and hierarchy without obvious vignetting effects.
Local Adjustment Brushes: Paint adjustments onto specific areas using local adjustment brushes. Brighten shadow areas selectively, enhance specific architectural details, or adjust color casts in particular zones. This precise control allows sophisticated tonal manipulation impossible with global adjustments alone.
Perspective Correction: Use lens correction profiles to eliminate distortion from wide-angle lenses. Apply perspective correction tools to straighten converging verticals from upward-tilted camera angles. The guided upright tool in Lightroom analyzes architectural lines and corrects distortion automatically with impressive accuracy.
Creative Enhancement
Dehaze Tool: The dehaze slider cuts through atmospheric haze affecting distant cityscape views from the Acropolis. Increase dehaze 15-30 points to restore contrast and clarity in distant elements while enhancing overall image pop. This tool proves particularly valuable for elevated viewpoint photography showing distant mountains and sea.
Split Toning: Add subtle split toning for creative color grading. Warm (orange) highlights and cool (blue) shadows create cinematic looks enhancing golden hour imagery. Apply conservatively (saturation 10-15%) to avoid obvious manipulation that undermines photograph credibility.
Sharpening Strategy: Apply final sharpening based on output medium. For screen viewing, use amount 40-70, radius 1.0, detail 25. For printing, increase amount to 90-110. Use masking (hold Alt/Option while adjusting masking slider) to sharpen only edge details, avoiding noise enhancement in smooth marble areas.
Smartphone Photography Optimization
Native Camera Capabilities
Wide Lens Priority: Use the smartphone’s native wide camera lens rather than ultra-wide or telephoto options which typically employ lower-quality sensors. The primary camera delivers best image quality, dynamic range, and low-light performance. Crop in post-processing rather than using digital zoom which destroys image quality.
HDR Mode: Enable HDR (High Dynamic Range) mode for challenging high-contrast scenes combining bright marble and dark shadows or sky. HDR merges multiple exposures automatically, capturing detail across the full tonal range impossible with single exposures. Some phones label this feature “Smart HDR” or “Auto HDR.”
Portrait Mode (Careful Use): Portrait mode’s artificial background blur works acceptably for detail shots isolating specific architectural elements. However, it struggles with complex subjects like column forests, creating unnatural blur transitions and edge halos. Use selectively and verify results carefully before trusting automatic computational photography.
Night Mode: For blue hour and illuminated monument photography, enable night mode which captures multiple frames and merges them for noise reduction and enhanced detail. Hold the phone steady for the 2-5 second capture period or brace against walls for maximum sharpness. Results often rival dedicated cameras for low-light smartphone photography.
Third-Party Apps for Control
Manual Exposure Control: Apps like ProCamera (iOS) or Manual Camera (Android) provide full manual control over shutter speed, ISO, and focus. This control proves essential for creative effects like motion blur or precise exposure compensation beyond native camera app capabilities.
RAW Capture: Shoot RAW format using Lightroom Mobile, ProCamera, or Halide for maximum post-processing flexibility. Smartphone RAW files contain significantly more recoverable highlight and shadow detail than JPEGs, essential for challenging Acropolis lighting conditions.
Long Exposure Apps: Specialized apps like Slow Shutter Cam or NightCap enable long exposures (up to 30 seconds) for blurring tourist crowds or creating smooth cloud motion. These techniques produce clean, people-free Acropolis images despite heavy crowds during peak season.
Smartphone Composition Tips
Grid Lines: Enable grid lines in camera settings to help align architectural elements with rule of thirds intersections and ensure level horizons. This simple guide dramatically improves compositional sophistication in spontaneous smartphone photography.
Exposure Lock: Tap and hold on the primary subject (typically the Parthenon) to lock exposure and focus. This prevents automatic exposure shifting as you reframe the composition, maintaining consistent exposure across a photo series.
Cleaning the Lens: Smartphone lenses accumulate fingerprints, dust, and pocket lint reducing image quality. Clean the lens with a microfiber cloth before important photography sessions. Dirty lenses create hazy, low-contrast images misattributed to poor lighting or cheap cameras when simple cleaning would resolve the issue.
Planning Your 2026 Photography Visit
Optimal Photography Seasons
April-May (Spring): Spring offers excellent photography conditions with dramatic cloud formations, green vegetation surrounding the Acropolis, and comfortable temperatures. The shoulder season provides smaller crowds, easier positioning at prime viewpoints, and longer shooting windows without extreme heat. Spring wildflowers add foreground color to external viewpoint photographs.
September-October (Fall): Fall provides similar advantages to spring with additional benefit of warm light from the lowering autumn sun angle. October particularly delivers spectacular light with the added benefit of post-summer heat wave relief making extended golden hour photography sessions comfortable.
June-August (Summer Challenge): Summer’s intense sun creates harsh midday light and extreme heat limiting shooting windows to early morning and evening golden hours. However, summer provides the longest days, enabling pre-sunrise and post-sunset photography. The extended blue hour allows leisurely illuminated monument photography after sunset.
December-February (Winter Opportunity): Winter’s dramatic storm clouds, low sun angles, and minimal crowds create excellent photography conditions for those willing to face occasional rain and cold. The low winter sun creates dimensional shadows throughout the day, not just during golden hour. Dramatic skies and unique lighting effects often produce the year’s best atmospheric images.
Multi-Day Photography Strategy
Day 1 – Interior Sunrise Session: Focus on interior Acropolis photography starting at 8 AM opening for crowd-free golden hour images. Spend 3-4 hours comprehensively photographing all monuments with optimal morning light on eastern facades. This dedicated session captures the essential portfolio images without time pressure.
Day 2 – External Viewpoints: Photograph the Acropolis from Filopappou Hill at sunrise, exploring multiple elevations and perspectives throughout the morning. After lunch, scout Areopagus Rock and Anafiotika neighborhood for sunset positions. This full day of external photography provides diverse perspectives complementing interior shots.
Day 3 – Sunset and Blue Hour: Return to the Acropolis interior mid-afternoon for sunset and blue hour photography of the western Parthenon facade and city views. Stay until closing to capture illuminated monuments against dark blue sky. This evening-focused session delivers dramatically different lighting from morning sessions.
Weather Day – Museum and Details: Reserve one flexible day for weather-dependent options. If rain arrives, spend the day at the Acropolis Museum photographing artifacts and the Parthenon Gallery, or work on post-processing previous days’ images. If weather remains clear, use the day for detail photography and lesser monuments requiring extended time.
2026 Updates & Changes
Opening Hours for Photography: The Acropolis opens at 8 AM throughout 2026, perfect for golden hour photography. Summer closing time extends to 8 PM (May-October), allowing sunset photography inside the monument. Check the official website for exact seasonal closing times as they vary monthly throughout the year.
Tripod Policy Clarification: Professional tripods and monopods over 1 meter require special photography permits obtained in advance. Lightweight travel tripods under 50cm height may be permitted during off-peak hours at security discretion. Contact the Ephorate of Antiquities of Athens for current photography equipment policies before planning professional shoots requiring special gear.
Drone Photography Restrictions: Drone photography remains prohibited throughout the Acropolis archaeological site and surrounding buffer zone. This restriction protects both the ancient monuments and maintains safety for thousands of daily visitors. Violators face substantial fines and equipment confiscation. All aerial Acropolis photographs require special permits obtained months in advance.
Commercial Photography Permits: Professional photography for commercial purposes (publications, stock photography, advertising) requires special permits and typically requires substantial fees. Personal travel and portfolio photography faces no restrictions beyond standard visitor rules. If planning commercial photography, contact authorities 6-8 weeks before your visit for permit applications.
Frequently Asked Questions
What’s the best single day for Acropolis photography?
Enter at 8 AM opening for morning golden hour interior photography, spend 2-3 hours shooting all monuments, exit for lunch and rest, then return for sunset session from 5-8 PM (summer). This provides two optimal lighting windows in one day. The €30 combo ticket technically allows single-day re-entry if you exit and return within the same operating day.
Can I photograph inside the Acropolis Museum?
Photography is permitted throughout the Acropolis Museum without flash. The museum’s excellent natural lighting through floor-to-ceiling windows creates ideal conditions for artifact photography. Tripods are prohibited, but handheld photography works well. The Parthenon Gallery on the top floor offers exceptional photography opportunities with sculptures displayed against Acropolis views through windows.
How do I photograph the Acropolis without tourists in my shots?
Arrive at 8 AM opening for 30-60 minutes of minimal crowd photography. Use neutral density filters for 10-30 second exposures that blur moving tourists into transparency while monuments remain sharp. Alternatively, photograph from external viewpoints where distance eliminates visible tourists. Post-processing clone stamp tool can remove remaining tourists from compositions.
What time does the Acropolis light up at night?
The Acropolis illumination activates at sunset throughout the year, remaining lit until midnight. The amber floodlights create warm monument glow visible from throughout Athens. Best viewing locations include Filopappou Hill, Areopagus Rock, and various hotel rooftops. Photographing illuminated monuments from outside provides dramatic nighttime images impossible from inside the closed site.
Should I bring a DSLR or is smartphone enough?
Smartphones produce excellent Acropolis photographs for personal use and social media. However, DSLRs and mirrorless cameras provide significantly better low-light performance, dynamic range, and detail for golden hour, blue hour, and large print applications. If you own serious camera gear, bring it. If not, modern smartphone photography delivers satisfying results with proper technique.
Can I sell my Acropolis photographs?
Personal travel photographs can be sold as art prints or through stock photography without special permissions. However, using Acropolis images for commercial advertising, product packaging, or publications may require permits and potentially usage fees. If planning commercial photography, verify current regulations with the Ephorate of Antiquities of Athens before shooting.
What’s the biggest photography mistake tourists make at the Acropolis?
Arriving mid-morning or afternoon when harsh overhead light creates extreme contrast and unflattering illumination. This timing produces typical disappointing tourist snapshots rather than memorable images. Arriving at opening time for golden hour photography transforms your Acropolis images from forgettable to portfolio-worthy with the same camera gear.
How much photography equipment can I bring into the Acropolis?
Standard photography bags with camera body, 2-3 lenses, filters, and accessories pass through security without issue. Extremely large bags may face scrutiny, but typical camera backpacks are acceptable. Avoid bringing unnecessary equipment that adds weight and slows shooting. A camera body with 2 lenses (wide-angle and telephoto) covers all Acropolis photography needs.
Are there photography workshops available at the Acropolis?
Several Athens-based photography companies offer Acropolis photography workshops and tours led by professional photographers familiar with optimal locations, timing, and techniques. These workshops typically start before opening time for exterior shots, then enter at opening for guided interior photography. Search for “Acropolis photography workshop Athens” to find current offerings and reviews.
Can I take photos inside the Parthenon itself?
Visitors cannot enter the Parthenon interior as it remains closed for preservation and ongoing restoration. Photography is limited to exterior views from all angles around the perimeter. However, the exterior columns, friezes, and architectural details provide endless photography opportunities without interior access. The Acropolis Museum displays interior sculptures and artifacts from the Parthenon in an accessible environment.