Český Krumlov Photography Guide: Mastering Medieval Architecture
Key Takeaways
- Lazebnický Bridge at dawn delivers the town’s most iconic castle reflection composition with calm water and golden light
- Wide-angle lenses (16-35mm) capture complete architectural contexts while telephoto (70-200mm) isolates Renaissance details
- Morning light (6-9 AM) illuminates castle facades from the east, while evening light (5-8 PM summer) creates warm tones on old town
- Low ISO (100-400), small apertures (f/8-f/16), and tripods ensure sharp architectural detail throughout the frame
- Autumn and winter provide superior photographic light with low sun angles, dramatic shadows, and atmospheric conditions
- Blue hour twilight (30-45 minutes after sunset) captures illuminated architecture against deep blue skies for dramatic compositions
Understanding Český Krumlov’s Photographic Appeal
Český Krumlov presents photographers with exceptional architectural density concentrated within the Vltava River’s dramatic horseshoe bend, creating natural compositional frameworks that emphasize the medieval town’s relationship with its landscape. The UNESCO World Heritage historic center combines 13th-century Gothic foundations, Renaissance transformations, and Baroque additions into cohesive visual narrative spanning seven centuries of European architecture. This layered architectural complexity provides endless photographic possibilities from grand panoramic vistas to intimate detail studies of weathered stonework and decorative elements.
The town’s elevated castle complex dominates the skyline, visible from dozens of vantage points across both riverbanks and surrounding hillsides. This vertical dimension creates three-dimensional compositions impossible in flat medieval centers, allowing photographers to capture the town from above, below, and at eye level within single shooting sessions. The Vltava River functions as natural foreground element, providing reflections during calm conditions and dynamic water movement during flow periods, adding visual interest to static architectural subjects.
Photographic conditions vary dramatically across seasons and daily light cycles, requiring understanding of solar angles, weather patterns, and atmospheric characteristics to optimize shooting opportunities. The compact geographic area enables covering all major viewpoints within single days, while the timeless architectural character ensures subjects remain constant across visits, allowing photographers to return during optimal conditions for specific compositions. Mastering Český Krumlov photography demands technical proficiency with camera settings, compositional awareness of architectural relationships, and patience waiting for ideal light and atmospheric conditions that elevate good photographs into exceptional images.
People Also Ask About Český Krumlov Photography
What camera equipment is best for photographing Český Krumlov?
Full-frame DSLR or mirrorless cameras deliver optimal results for architectural photography through superior dynamic range, low-light performance, and compatibility with professional lenses. Models like Canon EOS R5/R6, Nikon Z7/Z8, or Sony A7R series provide 30-50 megapixel resolution capturing fine architectural detail suitable for large prints. Crop-sensor cameras (Canon EOS 90D, Nikon D7500, Sony A6600) work effectively for photographers prioritizing portability over maximum image quality, though wider lenses become necessary to achieve equivalent field of view.
Wide-angle zoom lenses (16-35mm full-frame, 10-24mm crop-sensor) prove essential for capturing complete architectural contexts, castle panoramas, and interior spaces. These focal lengths encompass castle complexes, bridge perspectives, and narrow lane compositions within single frames. Standard zoom lenses (24-70mm) provide versatility for general shooting, while telephoto lenses (70-200mm) isolate architectural details, compress perspective creating layered compositions, and capture distant castle views from elevated positions.
Sturdy tripods enable sharp images at low ISO settings and small apertures necessary for architectural photography’s depth-of-field requirements. Carbon fiber models balance stability against portability for photographers covering multiple locations daily. Ballheads with quick-release plates facilitate rapid composition adjustments. Remote shutter releases or camera timer functions eliminate vibration during exposures, critical for long exposures during blue hour and night photography sessions.
Graduated neutral density filters help balance bright skies against darker foreground architecture, particularly during sunrise and sunset when dynamic range exceeds camera sensor capabilities. Circular polarizing filters deepen blue skies, enhance cloud contrast, reduce water reflections for submerged detail visibility, and minimize window glare on building facades. These optical filters often deliver superior results versus excessive post-processing correction of exposure imbalances.
What are the best times of day for photography?
Golden hour morning light (6-9 AM summer, 7-10 AM spring/autumn, 8-11 AM winter) illuminates castle facades from the east, creating warm color temperatures and directional shadows that reveal architectural texture and dimensional form. This period delivers optimal conditions for castle photography from western viewpoints including Lazebnický Bridge, riverside positions, and elevated garden areas. Morning light also provides calm atmospheric conditions before daytime winds disturb water surfaces, enabling reflection photography in the Vltava River.
Golden hour evening light (5-8 PM summer, 4-6 PM spring/autumn, 3-5 PM winter) bathes old town facades in warm tones while castle falls into shadow from eastern positions. This reversal benefits photographers shooting from castle gardens toward old town, from elevated southern viewpoints, and along eastern riverbanks. Evening light often delivers richer color saturation than morning sessions due to atmospheric particle accumulation throughout days creating enhanced warm tones.
Blue hour twilight (30-45 minutes after sunset) captures illuminated architecture against deep blue skies before full darkness arrives. Street lighting, building illumination, and window glow create artificial light sources adding visual interest while sky maintains sufficient ambient light for exposure without excessive contrast. Blue hour requires tripod stability for longer exposures (1-30 seconds depending on ambient light levels) but delivers dramatic atmospheric results impossible during daylight hours.
Midday light (11 AM-3 PM) creates harsh contrast and flat overhead illumination unsuitable for most architectural photography. However, this period works effectively for detail photography in shaded areas, interior courtyard shooting where buildings block direct sun, and exploring locations for return visits during optimal light. Overcast midday conditions provide soft even lighting suitable for architectural detail work and documentary photography emphasizing structure over dramatic lighting effects.
What focal lengths work best for different compositions?
Ultra-wide lenses (14-24mm full-frame, 10-18mm crop-sensor) capture expansive panoramic views including complete castle complex from riverside positions, full bridge spans with surrounding architecture, and comprehensive plaza compositions from elevated viewpoints. These extreme focal lengths require careful composition avoiding excessive sky or foreground that dilutes architectural impact. Perspective distortion becomes pronounced at close range, useful creatively but requiring awareness of converging vertical lines on tall buildings.
Wide-angle range (24-35mm full-frame, 16-24mm crop-sensor) represents the workhorse focal length for architectural photography, providing natural perspective while encompassing substantial architectural contexts. This range suits narrow medieval lane compositions, multi-building relationships showing architectural evolution, and general town documentation. The moderate wide angle minimizes perspective distortion while maintaining comprehensive coverage of architectural subjects.
Standard range (40-70mm full-frame, 28-50mm crop-sensor) delivers perspective closely matching human vision, creating natural-looking compositions without exaggerated wide-angle characteristics. This focal length excels for individual building portraits, architectural detail emphasis, and compositions where environmental context matters less than subject isolation. Standard lenses produce minimal distortion suitable for formal architectural documentation requiring accurate proportions.
Telephoto range (70-200mm full-frame, 50-135mm crop-sensor) compresses perspective layers, stacking architectural elements creating dense urban compositions. These focal lengths isolate distant castle details from elevated positions, capture tower elements against sky backgrounds, and photograph across river achieving compressed perspectives emphasizing vertical architecture. Telephoto work from castle gardens shooting toward old town creates unique compressed compositions impossible from ground level wide-angle positions.
How do you photograph the castle reflections effectively?
Castle reflection photography requires calm water conditions occurring most reliably during early morning hours (6-8 AM) before daytime winds develop. Lazebnický Bridge on the town’s eastern edge provides the classic reflection viewpoint with castle tower, Cloak Bridge, and old town facades mirrored in the Vltava’s bend. Position tripod at bridge level or descend to riverbank for lower angles emphasizing water surface and reducing sky proportion in frame.
Use small apertures (f/11-f/16) ensuring both castle architecture and reflection remain equally sharp throughout frame depth. Focus one-third into the scene (typically at horizon line where architecture meets water) maximizing depth of field across both actual buildings and reflected images. Polarizing filters can enhance or eliminate reflections depending on rotation—partial polarization often works best, deepening water color while maintaining visible reflections rather than eliminating them completely.
Composition balances actual architecture in upper frame against reflection in lower frame, often using 50/50 division or slight emphasis on architecture (60/40). Include foreground elements like riverbank vegetation, stones, or bridge structures providing depth and visual interest beyond simple mirror symmetry. Perfect mirror conditions create abstract qualities while slight water movement adds organic character distinguishing reflections from simple duplicates.
Morning golden hour light (6-7:30 AM summer) provides warm color temperatures on castle facades that reflect beautifully in water, while blue hour twilight (20-30 minutes after sunset) captures illuminated castle against blue sky with lights reflected in darkening water. Overcast conditions work surprisingly well for reflection photography, providing even lighting without harsh highlights and maintaining color saturation in both architecture and water surfaces.
What seasonal differences affect photography opportunities?
Spring delivers fresh green landscapes, blooming gardens, and rapidly lengthening daylight hours extending shooting windows. Trees leaf out progressively through April-May creating seasonal transformation visible across multi-week periods. Higher water levels from snowmelt create more dramatic river features and stronger currents adding motion to water photography. Variable weather patterns bring dramatic cloud formations and rapidly changing conditions requiring flexibility but offering unique atmospheric photography during weather transitions.
Summer provides longest daylight hours enabling dawn photography at reasonable hours (sunrise 5 AM) and extended evening sessions until late twilight (10 PM). Lush green foliage creates vibrant natural color palettes, though dense canopy may block some previously accessible viewpoints during leaf-off seasons. Crowded conditions affect photography logistics at popular locations, requiring earlier arrival times to secure positions before tourist flows begin. Harsher midday sun creates challenging lighting but dramatic evening golden hours as sun angles lower toward extended horizons.
Autumn features exceptional photographic conditions with fall foliage colors (October-early November), crisp atmospheric clarity creating sharp distant details, and low sun angles producing dramatic shadows throughout shortened days. Color palette shifts from summer greens to warm autumn tones complementing Renaissance architecture’s terracotta and ochre facades. Comfortable temperatures enable extended outdoor sessions without summer heat or winter cold. Decreasing daylight hours concentrate shooting into compressed morning and evening windows, increasing planning importance.
Winter offers unique photographic opportunities through snow-covered architecture creating fairytale atmosphics, dramatic low sun angles throughout short days producing constantly favorable light, minimal vegetation revealing architectural details obscured during leafy seasons, and Christmas market decorations adding festive elements. Challenges include limited daylight hours (8 AM-4 PM December), cold temperatures affecting battery life and photographer comfort, and slippery conditions requiring careful movement with expensive equipment. However, winter’s exceptional light quality and minimal tourist presence create intimate photography impossible during busy seasons.
Extended multi-day tours – 5+ days
Featured Bohemia Multi-Day Tour Packages
4 days
Prague, Czechia (Czech Rep.)
- ✓ Comprehensive Bohemia tour
- ✓ Expert local guides included
- ✓ All accommodation arranged
- ✓ Transportation provided

4 days
Czech Republic – Bohemian Treasures (Spa Retreat & Beer Heritage) 4-Day Tour
- ✓ Booking needs min. 2 travelers

5 days
Between Stories and Castles (7 destinations)
- ✓ Comprehensive Bohemia tour
- ✓ Expert local guides included
- ✓ All accommodation arranged
- ✓ Transportation provided
4 days
Prague Christmas Markets
- ✓ Comprehensive Bohemia tour
- ✓ Expert local guides included
- ✓ All accommodation arranged
- ✓ Transportation provided
Multi-day tour packages powered by TourRadar. Prices and availability subject to change.
Essential Camera Settings and Technical Approaches
Optimal Exposure Settings for Architecture
Shoot in RAW format capturing maximum image data for post-processing flexibility, particularly important for architectural photography requiring precise exposure adjustment, white balance correction, and shadow/highlight recovery. RAW files contain 12-14 stops of dynamic range versus JPEG’s 8 stops, critical when photographing bright skies against darker building facades or managing interior/exterior exposure differences.
Use Aperture Priority mode (A/Av) controlling depth of field while camera automatically adjusts shutter speed for correct exposure. Set apertures between f/8-f/16 for architectural photography, ensuring front-to-back sharpness encompassing foreground elements through distant architectural details. Smaller apertures (f/16-f/22) maximize depth of field for extreme close-up to infinity sharpness but risk diffraction softening that degrades overall sharpness—test your specific lens to determine optimal aperture balancing depth against sharpness.
Maintain low ISO (100-400) minimizing digital noise and maximizing image quality for large prints and detailed crops. Modern cameras handle ISO 800-1600 acceptably for handheld shooting during marginal light, but tripod-mounted photography enables base ISO usage ensuring cleanest possible files. Only increase ISO when subject movement or handheld shooting necessitates faster shutter speeds—static architecture benefits from long exposures at low ISO rather than elevated sensitivity settings.
Enable mirror lock-up (DSLR) or electronic first curtain shutter (mirrorless) eliminating vibration during exposures. Use 2-second timer or remote release triggering exposures, allowing any residual vibration from button press to dissipate before shutter opens. These technical refinements ensure maximum sharpness in final images, critical when photographing fine architectural detail intended for close examination or large-scale printing.
Exposure Strategies for High Dynamic Range Scenes
Bracket exposures when photographing high-contrast scenes exceeding camera sensor’s dynamic range, particularly during sunrise/sunset when bright skies meet darker architecture. Shoot 3-5 exposures at 1-2 stop intervals (-2, -1, 0, +1, +2 EV), later blending in post-processing to recover highlight and shadow detail impossible in single exposures. Most cameras offer automatic exposure bracketing (AEB) functionality simplifying the technical process.
Use graduated neutral density filters balancing exposure optically during capture rather than relying entirely on post-processing recovery. Position filter transition line along horizon or roofline, darkening bright sky 1-3 stops while leaving foreground architecture unaffected. This optical approach often delivers more natural results than heavy-handed digital recovery pushing shadows and pulling highlights beyond natural appearance limits.
Expose for highlights when shooting scenes with important sky detail, accepting darker shadows recoverable in post-processing. Modern camera sensors recover shadow detail more successfully than blown highlights which lose all color and detail information permanently. Check histogram ensuring highlight end doesn’t clip against right edge, indicating lost detail. Slight underexposure proves safer than overexposure for scenes with critical highlight information.
Shoot during optimal light conditions minimizing dynamic range challenges—overcast days provide naturally balanced lighting requiring less exposure management, while golden hour’s warm even light reduces sky-to-subject brightness differences compared to harsh midday sun. Blue hour’s balanced ambient and artificial light often falls within single exposure capabilities, eliminating need for bracketing or filtration when timed correctly.
Focus Techniques for Architectural Sharpness
Use single-point autofocus selecting focus point deliberately rather than allowing camera to choose focus location automatically. Place focus point on primary architectural subject or one-third into scene depth when maximizing depth of field across extensive focus range. This controlled approach ensures intended sharpness distribution rather than camera’s arbitrary decisions based on contrast detection or proximity.
Switch to manual focus for precise control when photographing through foreground elements, shooting multiple architectural planes, or working in low-contrast conditions challenging autofocus systems. Use live view magnification (10x or greater) checking critical focus on architectural details, ensuring precise focus placement before exposure. This methodical approach suits tripod-mounted photography where time permits careful technical execution.
Enable focus peaking (mirrorless cameras and live view) highlighting in-focus areas with colored overlay, providing visual confirmation of focus distribution across frame. Adjust peaking sensitivity and color for clear visibility against various background tones. This real-time feedback accelerates manual focus workflow while ensuring accuracy difficult to judge on small camera displays without magnification.
Consider focus stacking for extreme depth of field extending from immediate foreground through distant architecture beyond single-aperture capabilities. Shoot multiple exposures with focus point progressing through scene depth (near, middle, far), later blending focused regions in post-processing software (Photoshop, Helicon Focus). This advanced technique delivers front-to-back sharpness impossible through aperture alone, though requires stable tripod mounting and motionless subjects.
White Balance for Accurate Color Rendition
Shoot RAW enabling white balance adjustment during post-processing without image degradation, providing complete flexibility to correct color casts or adjust for creative effect. However, setting approximate white balance during capture improves LCD preview accuracy and establishes reasonable starting point for RAW processing workflow.
Use daylight white balance (5200-5500K) for natural color rendition during golden hour and midday shooting. This setting captures warm morning and evening light authentically without neutralizing desirable color tones. Auto white balance often overcorrects atmospheric warmth, producing cooler less emotionally engaging results than manual daylight setting preserving natural light quality.
Set cloudy white balance (6000-6500K) for overcast conditions, adding warmth compensating for cool color cast from cloud-filtered light. This slight warming typically improves architectural color rendition making stone, terracotta, and painted facades appear more appealing than technically accurate but aesthetically cool auto white balance results. Bracket white balance when uncertain, shooting frames at different settings for comparison during editing.
Correct mixed lighting situations during blue hour when warm artificial street lighting combines with cool twilight sky. Shoot RAW allowing separate white balance adjustment for different light sources in post-processing, or accept mixed color temperatures as authentic representation of the scene’s actual lighting character. Custom white balance using gray card establishes neutral baseline, though often produces less emotionally engaging results than accepting scene’s natural color temperature variations.
Prime Photography Locations and Viewpoints
Lazebnický Bridge – Iconic Reflection Viewpoint
Lazebnický Bridge provides Český Krumlov’s most photographed perspective, capturing castle tower, Cloak Bridge, and colorful old town facades reflected in the Vltava River’s calm waters during optimal conditions. Access the bridge from the old town’s eastern edge via Kájovská Street or riverbank pathways. The bridge itself offers elevated perspective, while descending to riverbank level provides lower angles emphasizing water surface and reducing sky proportion.
Morning golden hour (6-8 AM) delivers optimal light illuminating castle facades from the east while water remains calm before daytime winds develop. Position on bridge’s western side or northern riverbank for classic composition balancing castle in upper frame against reflection below. Use wide-angle lenses (16-35mm) capturing complete architectural sweep, or standard focal lengths (35-50mm) for tighter compositions emphasizing castle tower and bridge relationships.
Shoot small apertures (f/11-f/16) ensuring sharpness throughout depth from immediate foreground through distant castle details. Include foreground elements like riverbank stones, vegetation, or bridge structures adding depth beyond simple reflection photography. Partial polarizer rotation enhances water color while maintaining visible reflections, avoiding complete polarization that eliminates reflections entirely.
Return during blue hour twilight (30 minutes after sunset) capturing illuminated castle against deep blue sky with lights reflected in darkening water. This atmospheric period requires longer exposures (5-30 seconds) necessitating stable tripod mounting. Winter snow conditions add foreground interest, while autumn foliage provides colorful framing elements. The location remains accessible year-round though icy conditions require cautious footing during winter months.
Castle Gardens – Elevated Overview Perspectives
Castle gardens provide elevated viewpoints overlooking the old town’s terracotta rooftops, church spires, and river bend, creating layered compositions impossible from ground-level positions. Access gardens via castle courtyards crossing Cloak Bridge, then proceeding through formal Baroque terraces to various elevated overlooks. The gardens remain free to access sunrise to sunset year-round, offering peaceful shooting environments with minimal tourist interference during early morning hours.
Upper terrace viewpoints (near Bellarie summer house) deliver highest elevation capturing comprehensive town overviews with countryside beyond. These positions suit wide-angle panoramic photography (16-24mm) encompassing complete urban context within the river’s horseshoe bend. Telephoto lenses (70-200mm) compress perspective stacking architectural layers, isolating specific building groups, or capturing distant details across the river valley.
Midday top-lighting creates harsh conditions for town photography, but gardens’ tree coverage provides shaded positions for architectural detail work and compositional planning. Afternoon light (3-6 PM) gradually improves as sun angles lower, creating dimensional shadows revealing rooftop textures and architectural three-dimensionality. Evening golden hour produces warm light on old town facades particularly effective during summer when sun positions northwest illuminating western-facing buildings.
Formal garden parterres in foreground add geometric elements and seasonal color (spring bulbs, summer plantings, autumn foliage) providing visual interest beyond pure architectural documentation. Fountain systems (operational May-September) create water feature foregrounds, though static sculptures work year-round. Winter snow covering garden terraces produces clean white foreground contrasting warm terracotta architecture, while spring blooms add vibrant color notes to predominantly earth-toned architectural palettes.
Plášťový Bridge – Dramatic Castle Perspectives
The iconic Cloak Bridge (Plášťový most) connecting castle to gardens presents dramatic three-story arched architecture spanning the gorge 30 meters above ground level. Photograph the bridge itself from multiple angles or use the covered bridge interior as shooting platform for protected all-weather photography. The bridge’s distinctive arcaded architecture creates recognizable Český Krumlov imagery suitable for portfolio pieces emphasizing unique architectural elements.
Shoot bridge exterior from approaches below capturing full vertical scale and arched construction. Morning light from eastern positions illuminates bridge facades creating dimensional form through directional shadows. Wide-angle lenses (16-24mm) encompass complete bridge structure with surrounding architecture, while normal focal lengths (35-50mm) isolate bridge details against sky backgrounds. Include people for scale emphasizing massive stone construction and vertical dimension.
Use bridge interior as elevated shooting platform protected from weather and sun. The covered arcade provides shaded position for photographing sun-lit old town and river below, managing contrast more effectively than open locations. Windows and archways frame compositions, adding architectural foreground elements directing attention toward background subjects. This covered position enables photography during rain or harsh midday sun when exterior positions prove challenging.
Twilight photography captures illuminated bridge against darkening sky, emphasizing architectural form through artificial lighting. Long exposures (10-30 seconds) smooth water in gorge below while accumulating ambient light for proper exposure. The bridge’s lighting system creates warm tones contrasting cool blue hour sky, producing dramatic color relationships impossible during daylight hours. Winter conditions add snow accumulation on bridge structures creating high-contrast monochromatic opportunities.
Kájovská Street – Old Town Elevated View
Kájovská Street on the old town’s eastern hillside provides elevated positions overlooking terracotta rooftops, church spires, and distant castle tower. These intermediate-elevation viewpoints deliver different perspective than ground-level lanes or high castle gardens, creating unique layered compositions unavailable from more obvious locations. Access via stepped streets climbing from riverfront, requiring moderate physical effort rewarded with exclusive photographic positions.
Telephoto lenses (70-200mm) compress architectural layers creating dense urban compositions stacking multiple building planes. Shoot across rooftops toward castle tower, isolating church spires against sky, or capturing repeating patterns of chimneys and dormer windows. Midday top-lighting reveals rooftop textures and terracotta tile variations, while low-angle morning and evening light creates dramatic shadows emphasizing three-dimensional roofscape.
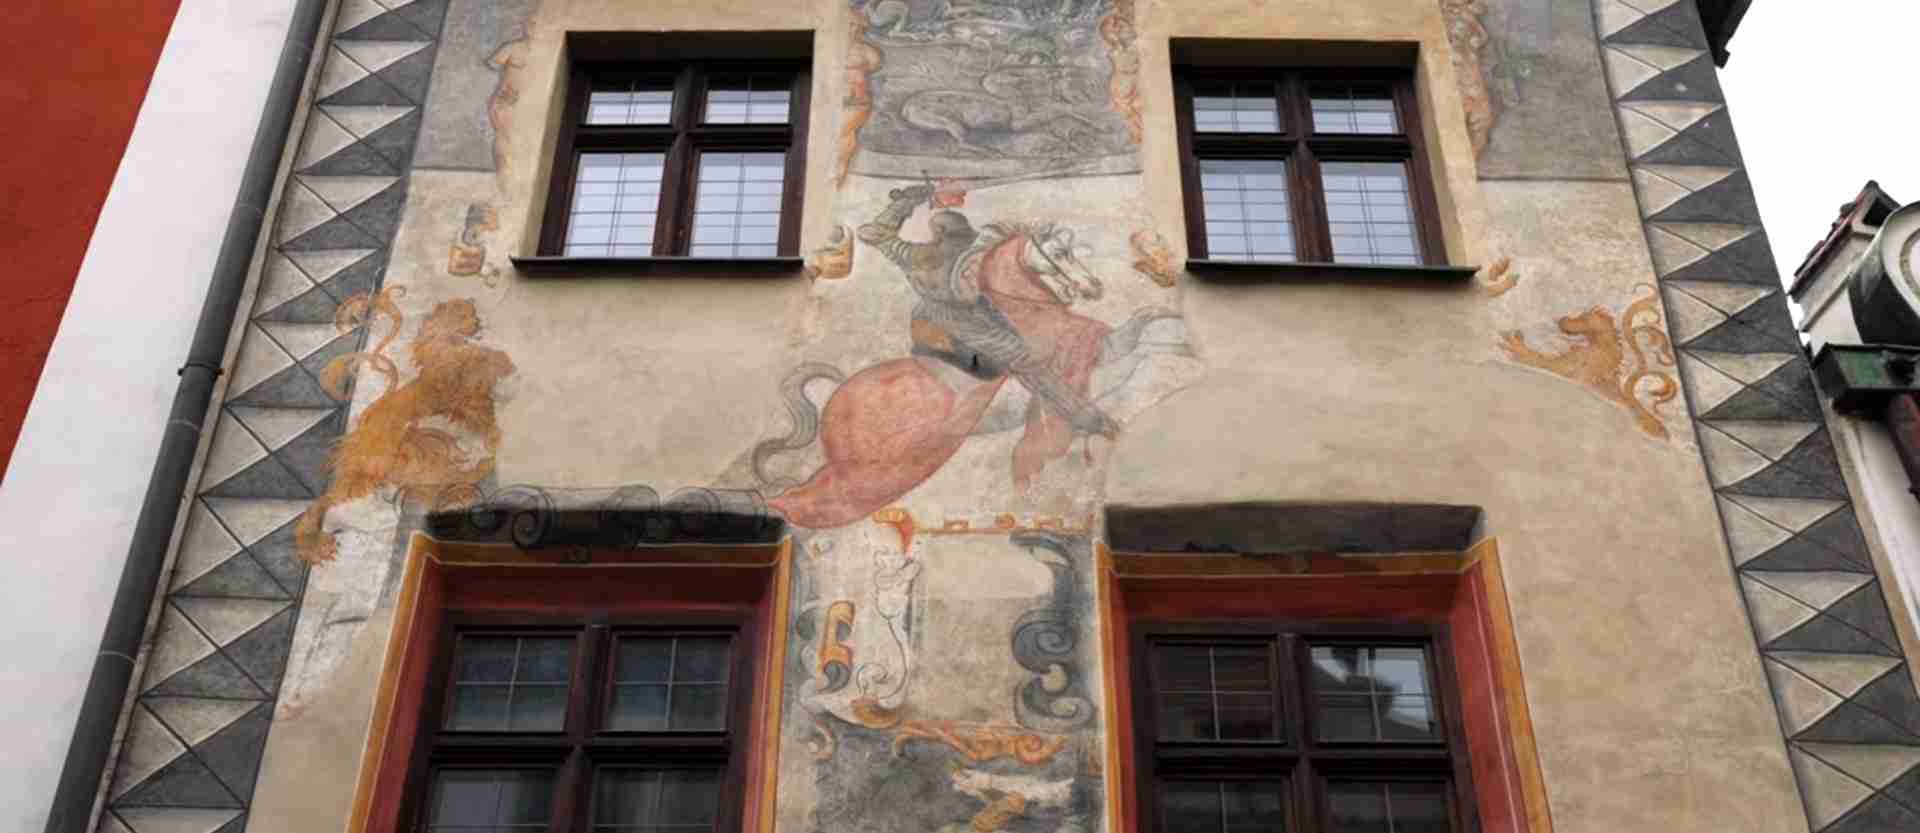
Include foreground architectural elements—window frames, doorways, roof edges—creating depth through layered compositional planes. These positions work effectively for detail-oriented photography emphasizing Czech architectural characteristics: decorative sgrafitto, painted facades, historic roof tiles, and chimney varieties. Long focal lengths isolate specific details, extracting abstract compositions from complex architectural contexts.
Seasonal variations affect this location significantly—winter’s bare trees maximize architectural visibility, spring and autumn foliage adds natural framing elements, summer’s dense canopy sometimes blocks previously accessible viewpoints requiring alternative positioning. Early morning and late evening provide best light angles with low sun creating dimensional shadows across roofscape. The relatively unknown location experiences minimal tourist traffic enabling peaceful shooting without crowds.
Riverbank Promenade – Street-Level Perspectives
The riverfront promenade along Rooseveltova on the old town’s northern edge provides accessible street-level photography with continuous castle views across water. This paved walkway offers easy access for wheeled tripods and equipment transport while delivering unobstructed sightlines toward castle complex. The location works effectively for progression photography, walking slowly while shooting variations of similar compositions.
Morning light illuminates castle from the east creating optimal conditions from western riverbank positions. Use the river as foreground element leading eye toward castle, or include bridge structures, boats, and waterfront architecture creating environmental context. Wide to standard focal lengths (24-70mm) capture relationships between water, bridges, and architecture, while telephoto compression (100-200mm) stacks architectural elements emphasizing vertical tower against horizontal old town facades.
Midday overhead lighting creates harsh conditions but enables photographing architectural details in full illumination for documentary purposes. Overcast conditions provide even lighting suitable for color work emphasizing painted facades and architectural features without dramatic shadow distractions. Afternoon side-lighting gradually improves creating dimensional form and textural revelation on building surfaces.
The accessible promenade enables shooting during challenging conditions when steep locations prove difficult—wet weather, ice, equipment transport, mobility limitations. Benches provide rest positions and steady platforms for long lens work. The location’s accessibility makes it popular with tourists requiring strategic timing (early morning, late evening) for uncrowded photography, though daytime shooting necessarily includes people adding environmental context and scale to architectural subjects.
Composition Techniques for Architectural Photography
Layering and Depth Creation
Create depth in architectural photography through deliberate foreground-midground-background relationships guiding viewer’s eye through compositional space. Position foreground elements—bridge railings, archways, vegetation, street furniture—establishing near plane that creates entry point into composition. These foreground elements should frame or lead toward primary architectural subjects without overwhelming them through excessive prominence or visual weight.
Use architectural elements as natural frames directing attention toward background subjects. Shoot through doorways, windows, arches, or tree branches creating dark frames around lighter background architecture. This framing technique adds depth dimension while controlling viewer attention, preventing eye from wandering aimlessly across frame. Ensure framing elements remain sufficiently sharp (f/8-f/11 minimum) appearing intentional rather than accidentally out-of-focus distractions.
Employ leading lines—streets, bridges, building edges, water channels—drawing eye from foreground through midground toward background architectural subjects. Cobblestone street patterns create converging lines leading toward architectural focal points. River course, bridge alignments, and building facades all provide linear elements organizing compositional flow. Position these leading lines strategically, typically entering frame from corners or edges rather than bisecting center which creates static symmetrical compositions.
Control depth perception through aperture selection and focus point placement. Small apertures (f/11-f/16) maximize depth of field keeping all compositional planes sharp, suitable for layered architectural compositions requiring complete clarity. Alternatively, use moderate apertures (f/4-f/5.6) with selective focus isolating midground subjects against softened foreground and background, creating emphasis through sharpness differentiation rather than complete clarity throughout frame depth.
Perspective Control and Vertical Line Management
Prevent converging vertical lines on tall buildings by maintaining camera back parallel to building facades, keeping camera level rather than tilting upward. Use bubble level (built-in or hot-shoe mounted) confirming horizontal camera orientation. This technique requires wider lenses capturing building tops while standing farther back, or shooting from elevated positions at building mid-height enabling horizontal camera orientation encompassing full structure.
Accept converging verticals as dramatic compositional element rather than technical flaw requiring correction. Extreme upward angles create dynamic energetic compositions emphasizing vertical scale and architectural height. This approach works particularly effectively with towers, church spires, and castle structures where vertical emphasis reinforces the architecture’s intended imposing character. Shoot from very close range with wide lenses maximizing convergence for dramatic effect.
Correct perspective distortion in post-processing when level shooting proves impossible due to limited space or required composition. Use lens correction and perspective tools in Lightroom, Photoshop, or Capture One straightening vertical lines to parallel. This digital correction crops image significantly—shoot wider than final composition anticipating crop losses during perspective adjustment. Extreme corrections create unnatural stretching in frame corners, limiting correction magnitude before results appear distorted.
Use tilt-shift lenses enabling perspective control during capture through lens movements, avoiding digital correction’s quality degradation. These specialized lenses prove expensive but deliver superior architectural photography results for photographers regularly working with buildings. The shift function maintains vertical parallels while encompassing tall structures, and tilt enables selective focus plane control for creative effects or technical problem-solving in architectural contexts.
Light and Shadow as Compositional Elements
Recognize directional light creating shadows that reveal architectural three-dimensionality and surface texture invisible in flat frontal lighting. Position relative to sun angle emphasizing the dimensional shadows—side-lighting creates maximum shadow length and textural revelation, while slight back-lighting produces rim-lighting effects outlining architectural forms. Morning and evening low-angle light produces longest shadows with most dramatic dimensional effects.
Use shadow patterns as compositional elements themselves, not merely byproducts of lighting direction. Window shadows cast on building facades, archway shadows on cobblestones, and tower shadows across roofscapes create graphic elements adding visual interest. These shadow patterns change constantly as sun moves, enabling multiple compositions from single locations across daily and seasonal light cycles. Winter’s low sun creates particularly dramatic shadow lengths even during midday periods.
Balance light and shadow areas maintaining detail in both regions rather than allowing pure black shadows or blown-out highlights. Shoot during optimal light periods (golden hour, overcast conditions) when dynamic range falls within camera sensor capabilities. Use fill flash, reflectors, or HDR techniques recovering shadow detail in high-contrast situations. However, accept some pure black shadows when they contribute to composition’s graphic impact rather than treating all shadow as detail loss requiring correction.
Observe how different surfaces reflect light creating varied tonal values even in similar lighting conditions. Stone, plaster, terracotta, glass, and metal surfaces all respond differently to identical lighting, creating natural tonal separation distinguishing architectural elements without requiring dramatic lighting contrasts. Photograph across varied surface materials emphasizing these inherent reflectivity differences through careful exposure placing materials appropriately within tonal range from dark to light.
Color Theory in Architectural Photography
Recognize color relationships within the scene creating harmonious or contrasting color compositions. Český Krumlov’s dominant warm palette—terracotta roofs, ochre facades, golden stonework—creates analogous color harmony. Blue sky, green foliage, or blue hour twilight introduce complementary colors creating color contrast and visual tension. Use these inherent color relationships deliberately rather than accidentally, composing to emphasize harmony or contrast based on intended emotional impact.
Include limited saturated color accents within predominantly neutral architectural palettes directing viewer attention. Red doors, green shutters, colorful shop signs, or flower boxes provide color punctuation against earth-toned buildings. Position these color accents strategically within composition, typically off-center following rule-of-thirds principles. Avoid excessive color variety creating visual chaos—one or two strong color notes prove more effective than multiple competing colors diluting compositional focus.
Shoot during golden hour when warm light transforms neutral architectural colors into rich warm tones enhancing the scene’s inherent warmth. This color temperature shift proves particularly effective on terracotta and ochre surfaces that absorb warm light beautifully. Conversely, blue hour’s cool tones create color contrast against warm artificial building lighting, producing dramatic color temperature juxtaposition impossible during daylight hours.
Consider converting images to black and white when color distracts from architectural form, texture, or composition. Monochromatic presentation emphasizes tonal relationships, graphic patterns, and architectural geometry without color’s emotional content. This approach works particularly well for high-contrast situations, dramatic shadow patterns, and minimalist compositions where color adds complexity without proportional value. However, recognize Český Krumlov’s inherent color appeal often justifies color presentation despite compositional considerations favoring monochrome.
Seasonal Photography Strategies
Spring Photography Opportunities
Spring provides transforming landscapes as gardens bloom, trees leaf out, and countryside transitions from winter browns to vibrant greens. Castle gardens display spring bulbs (April), flowering trees (May), and fresh green foliage creating colorful foregrounds for architectural photography. This seasonal transformation enables documenting the same locations across weeks showing progressive landscape change framing constant architectural subjects.
Variable spring weather brings dramatic cloud formations and rapidly changing atmospheric conditions creating dynamic skies impossible during stable summer weather. Photograph during weather transitions when clearing storms produce dramatic cloud gaps with sunbeams illuminating architecture against dark storm backgrounds. These momentary lighting conditions require readiness and quick response but deliver exceptional dramatic images worth the unpredictability.
Higher water levels from snowmelt create more impressive river features with stronger currents adding motion to water photography. Use longer exposures (1-4 seconds) smoothing water into silky flows contrasting static architecture. However, increased flow also disturbs water surface preventing calm reflection photography until later spring when water levels moderate and winds decrease allowing mirror-still conditions.
Rapidly lengthening daylight hours extend photography windows as spring progresses. April sunrise occurs around 6:30 AM with sunset 7:30 PM, while May shifts to 5:30 AM sunrise and 8:30 PM sunset. This progressive change enables earlier dawn photography and extended evening sessions as season advances. Spring’s moderate temperatures allow comfortable extended outdoor photography sessions without summer heat or winter cold affecting photographer endurance.
Summer Light and Conditions
Summer delivers longest daylight hours enabling extensive photography schedules. June solstice provides sunrise 4:50 AM and sunset 9:10 PM with usable twilight until 10 PM, creating 5+ hour windows for optimal light photography (dawn through morning, evening through twilight). These extended hours suit photographers preferring comprehensive daily coverage or needing multiple attempts at specific compositions under ideal conditions.
Dense summer foliage creates natural green frames and foreground elements but also blocks some viewpoints accessible during leaf-off seasons. Scout locations throughout seasons understanding which positions remain viable year-round versus seasonal limitations. Gardens reach maximum lushness with full flowering creating vibrant foreground opportunities, though some may find the intense green overwhelming architectural subjects requiring strategic composition balancing vegetation against architecture.
Harsh midday summer sun creates challenging lighting conditions with extreme contrast and unflattering overhead illumination. Use this period for location scouting, planning compositions for return during optimal light, indoor photography, or detail work in shaded areas. Alternatively, embrace harsh light creatively photographing graphic shadow patterns and high-contrast architectural details. Overcast summer days provide excellent even lighting for color work and documentary photography.
Crowds affect summer photography requiring strategic timing and patience. Arrive at popular viewpoints early morning (before 8 AM) securing positions before tour groups arrive. Photograph major landmarks during early evening when day-trippers depart, or extend into blue hour when tourist presence disappears completely. Accept that some locations remain busy throughout summer days, incorporating people as environmental elements adding scale and context rather than viewing crowds as purely negative intrusion.
Autumn Photographic Excellence
Autumn provides optimal photographic conditions combining favorable light, comfortable temperatures, and dramatic seasonal transformation. Fall foliage (October-early November) adds warm color palette—reds, oranges, yellows—complementing Renaissance architecture’s earth tones. Photograph from elevated positions emphasizing autumn forest colors surrounding the town, or use colorful foliage as foreground framing architectural subjects.
Crisp autumn atmospheric clarity creates sharp detail in distant views as summer humidity decreases and air quality improves. This exceptional clarity enables telephoto photography capturing distant details with unusual sharpness, and wide-angle work maintaining corner-to-corner sharpness across extensive depth. Landscape photography beyond immediate architectural subjects benefits particularly from autumn’s transparent atmospheric conditions.
Low sun angles throughout autumn days produce constantly favorable light quality with extended golden hours and minimal harsh midday period. September and October sun arcs lower across southern horizon creating directional side-lighting throughout midday hours, not just during dawn and dusk. This favorable light enables productive all-day photography versus summer’s limited optimal light windows concentrated at day’s beginning and end.
Decreasing daylight hours concentrate photography into compressed windows requiring efficient workflow and advance planning. October sunset occurs around 6 PM versus summer’s 9 PM, eliminating the extended evening sessions possible during longer days. However, this compression often improves work quality through focused intensive shooting during available light rather than diffused effort across excessive hours. Autumn’s moderate crowds provide accessible viewpoints without summer’s competition for prime positions.
Winter Photography Character
Winter snow transforms Český Krumlov into fairytale landscape with white-covered roofs, snow-laden trees, and pristine foreground contrasting warm architectural colors. Fresh snow provides clean monochromatic palette emphasizing architectural form and creating high-contrast opportunities. Photograph during and immediately after snowfall capturing accumulation on architectural details—window ledges, roof ridges, decorative elements—before melting or wind removal.
Dramatic low winter sun angles create constantly favorable light throughout short days. December sun rises 7:50 AM and sets 4 PM, remaining low across southern horizon throughout the 8-hour daylight period. This creates extended golden hour quality light even during midday, eliminating summer’s harsh overhead illumination problem. Side-lighting and back-lighting dominate as sun never reaches overhead position, producing dimensional shadows revealing architectural texture and form continuously.
Christmas market decorations (late November-early January) add festive elements unavailable other seasons. Photograph market stalls, holiday lighting, decorations on buildings, and evening illumination creating warm atmospheric scenes. Blue hour proves particularly effective during market period, capturing warm artificial lighting against cool twilight sky with holiday decorations adding visual interest impossible during bare winter periods without seasonal enhancement.
Limited daylight hours require disciplined scheduling maximizing productive shooting time. Plan specific locations for specific times based on light direction and quality, avoiding wasted time traveling during optimal light periods. Scout locations during midday planning evening return, or photograph morning locations first before moving to afternoon positions. Winter’s compressed schedule demands efficiency but often produces superior photography through forced concentration during premium light rather than casual all-day approach possible during summer’s extended hours.
Advanced Techniques and Creative Approaches
Long Exposure Photography
Long exposure techniques smooth water into misty flows contrasting static architecture, create motion blur in clouds revealing movement patterns, and eliminate transient elements like vehicles and pedestrians from scenes. Use neutral density filters reducing light entering the lens, enabling extended exposures during daylight hours. ND filters come in various strengths (3-stop, 6-stop, 10-stop) with stronger filters enabling longer exposures under brighter conditions.
Calculate correct exposure when using ND filters by metering scene before filter attachment, then applying filter and adjusting shutter speed accordingly. A 10-stop ND filter requires 1000x longer exposure—1/125 second becomes 8 seconds, 1/60 becomes 16 seconds. Modern cameras often handle through-the-filter metering adequately though manual calculation provides verification. Shoot test exposures checking results before committing to full creative sequence.
Photograph flowing water at varying shutter speeds achieving different aesthetic effects. Very short exposures (1/250-1/1000 second) freeze water motion showing individual droplets and wave structure. Moderate speeds (1/4-1 second) create partial blur showing motion while maintaining some water structure. Long exposures (10-60+ seconds) completely smooth water into ethereal mist eliminating all detail. Experiment across this range determining preferred aesthetic for specific scenes and conditions.
Use long exposures during blue hour eliminating moving people from crowded locations. Exposures of 30-120 seconds render pedestrians invisible as they pass through frame, provided they don’t remain stationary anywhere within composition. This technique creates mysteriously empty scenes in normally busy locations. However, recognize stationary figures remain visible requiring strategic timing between pedestrian flows or accepting occasional figure presence as authentic environmental element.
Panoramic Photography Techniques
Create panoramic images capturing wider field of view than single frame allows, ideal for encompassing complete castle complex, comprehensive town overviews, or ultra-wide architectural contexts. Shoot series of overlapping vertical-format images (20-40% overlap between frames), later stitching in Photoshop, Lightroom, or specialized panorama software. Vertical orientation provides taller final panorama versus horizontal frame series creating letterbox proportions.
Use tripod with panoramic head enabling precise rotation on nodal point, preventing parallax errors between frames. Set camera to manual mode (exposure, focus, white balance) ensuring consistency across frame series. Lock focus at hyperfocal distance ensuring sharpness throughout scene depth across all frames. This technical consistency proves critical for successful stitching—varying exposure, focus, or white balance between frames creates visible discontinuities in final panorama.
Shoot panoramas during optimal light providing even illumination across complete scene. Sunrise and sunset create gradient lighting with bright zones near sun position and darker areas opposite, making consistent exposure across panorama challenging. Overcast conditions or midday light (when aesthetically acceptable) provides most even illumination for technical success. Alternatively, shoot multiple panorama sequences at different exposures, later creating HDR panorama combining exposure bracketing with panoramic stitching.
Export final panoramas at high resolution enabling large prints showcasing architectural detail impossible in standard single-frame captures. Modern panoramic stitching creates files exceeding 100 megapixels from 20-30 megapixel source cameras. This resolution enables massive prints, extreme crops maintaining quality, or detailed examination of architectural elements throughout the expansive scene. However, recognize file sizes challenge computer processing power and storage capacity requiring appropriate hardware for efficient workflow.
Night Photography Approaches
Night photography captures illuminated architecture against dark skies creating dramatic contrast and mood impossible during daylight. Shoot during blue hour when sky retains deep blue color rather than pure black, providing color contrast against warm artificial building lighting. This optimal window lasts 20-40 minutes after sunset requiring quick efficient work covering multiple compositions during limited time period.
Use tripod enabling long exposures (5-30 seconds) accumulating sufficient light for proper exposure at low ISO settings. Enable long-exposure noise reduction if available, though recognize this feature doubles capture time as camera shoots dark frame for noise subtraction. Manual focus works more reliably than autofocus struggling in low light—use live view magnification confirming critical focus before exposure. Include illuminated foreground elements—street lights, shop windows, lit pathways—adding visual interest and exposure reference.
Balance multiple light sources in scene—tungsten street lighting (warm orange), fluorescent shop signs (cool green), architectural floodlighting (variable color), moonlight (cool blue). Set daylight white balance allowing mixed color temperatures to record naturally, creating authentic nighttime ambiance. Alternatively, correct for primary light source creating neutral appearance though potentially losing atmospheric character. Shoot RAW enabling white balance adjustment in post-processing without committing during capture.
Photograph star trails or Milky Way when combining astronomical and architectural subjects. Star trails require exposures of 15-60+ minutes (or multiple shorter exposures stacked in post-processing) showing star rotation around celestial poles. Milky Way photography demands extremely high ISO (3200-6400), wide apertures (f/2.8 or faster), and short exposures (15-30 seconds) before star trailing becomes visible. Both techniques work best during new moon phases in locations with minimal light pollution, challenging in town center but viable in countryside viewpoints overlooking Český Krumlov.
Detail and Abstract Photography
Isolate architectural details creating abstract compositions emphasizing pattern, texture, color, and form divorced from obvious context. Photograph repeating elements—windows, roof tiles, door hardware, decorative sgrafitto, weathered surfaces—creating pattern-based compositions. Use telephoto lenses compressing perspective and isolating details, or macro lenses for extreme close-up work revealing texture invisible to casual observation.
Look for geometric abstraction within architectural complexity—lines, curves, angles, repetition creating compositional interest through pure form rather than recognizable subject matter. Shooting straight upward in courtyards captures architectural geometry against sky backgrounds. Extreme close-ups of decorative elements remove context creating studies in color and texture. These abstract approaches complement straightforward documentation, providing portfolio variety and creative exploration.
Emphasize architectural texture through appropriate lighting and exposure. Side-lighting reveals surface texture through highlight and shadow patterns. Use directional morning or evening light emphasizing texture on weathered stone, aged plaster, and rustic wood surfaces. Slight underexposure increases texture visibility through enhanced contrast, though avoid excessive darkening creating muddy unreadable surfaces. Convert to black and white when texture and form dominate color as compositional interest.
Create juxtaposition studies contrasting architectural elements—old versus new, weathered versus maintained, ornate versus plain, religious versus secular. Position contrasting elements within single frame creating visual tension and commentary. These comparative approaches work well for documentary series exploring architectural evolution, preservation challenges, or cultural values expressed through built environment. Detail work complements wide environmental photography providing comprehensive architectural documentation beyond single approach limitations.
Post-Processing Workflow for Architectural Images
RAW Processing Fundamentals
Import RAW files into Lightroom, Capture One, or Camera Raw establishing organized workflow. Create collections or folders organizing images by location, date, or subject enabling efficient retrieval. Apply initial culling deleting obvious failures (focus errors, severe exposure problems, compositional disasters) before investing time in processing. Rate remaining images identifying strongest candidates for full processing versus quick adjustments or archival storage.
Begin processing with exposure correction establishing proper overall brightness. Architectural photography typically benefits from slight exposure reduction versus camera’s metered exposure, creating richer more saturated colors and preventing highlight clipping. Adjust highlights and shadows separately recovering detail in bright skies and dark building interiors. Modern RAW processors recover impressive detail from shadows though excessive recovery creates unnatural flat appearance lacking depth dimension.
Correct white balance for accurate color rendition or creative color grading. Use white balance tool sampling neutral gray surface (stone, concrete, modern buildings) establishing accurate baseline. Alternatively, adjust temperature and tint sliders by eye creating visually pleasing color balance regardless of technical accuracy. Architectural photography permits creative white balance adjustment—warming for emotional appeal, cooling for contemporary clean aesthetic, or accurate neutral for documentary purposes.
Apply lens corrections addressing distortion, vignetting, and chromatic aberration. Enable automatic lens profile correction allowing software to compensate for specific lens optical characteristics. Manual distortion correction straightens bowed lines created by lens barrel or pincushion distortion. Remove vignetting (darkened corners) or adjust to taste—some vignetting draws eye toward frame center though excessive darkening appears unprofessional. Eliminate chromatic aberration (color fringing along high-contrast edges) through automatic or manual correction.
Architectural-Specific Adjustments
Use perspective correction tools straightening vertical lines that converge when photographing tall buildings from ground level. Transform tool in Lightroom or Photoshop allows vertical, horizontal, and rotational adjustment creating parallel vertical lines. Recognize perspective correction crops image significantly—shoot wider than final composition anticipating lost pixels during transformation. Extreme corrections stretch frame corners creating unnatural distortion requiring moderation balancing straight verticals against natural appearance.
Enhance architectural detail through selective sharpening and clarity adjustments. Apply moderate clarity boost (10-30) emphasizing midtone contrast revealing architectural texture and dimensional form. Sharpen selectively using masking limiting sharpening to architectural detail while avoiding sky and smooth surfaces showing noise and artifacts from excessive sharpening. Specialized sharpening in Photoshop using high-pass filter or unsharp mask provides greater control than Lightroom’s global sliders.
Manage color saturation carefully—architectural photography typically benefits from moderate saturation increase versus camera default, though excessive saturation creates garish unrealistic results. Adjust individual color channels (HSL panel) fine-tuning specific hues rather than global saturation affecting all colors equally. Warm tones (reds, oranges, yellows) typically accept higher saturation than cool tones (blues, greens) which appear unnatural when oversaturated. Use luminance adjustments brightening or darkening specific colors creating separation without saturation changes.
Apply graduated or radial filters creating localized adjustments mimicking photographic filters but with complete control. Darken bright skies using graduated filter maintaining detail while preventing sky from dominating composition. Lighten building facades using radial filters drawing attention to primary subjects. These localized adjustments prove more sophisticated than global corrections affecting entire image uniformly, enabling precise control maintaining natural appearance while enhancing compositional impact.
Advanced Retouching and Enhancement
Remove temporary elements detracting from architectural subject—trash bins, vehicles, utility wires, scaffolding, temporary signage. Use Photoshop’s clone stamp, healing brush, or content-aware fill removing distractions. However, maintain ethical standards avoiding misrepresentation—remove temporary elements but preserve permanent architectural features including deterioration, modifications, or modern additions. Documentary photography demands accuracy while creative work permits greater liberty in pursuit of ideal aesthetic representation.
Blend multiple exposures creating high dynamic range images recovering highlight and shadow detail beyond single exposure capabilities. Use HDR software (Photomatik, Aurora HDR, Lightroom HDR Merge) or manual blending in Photoshop layers. Avoid excessive HDR processing creating unnatural surreal appearance—architectural photography benefits from subtle HDR application maintaining realistic tonality while expanding visible detail range. Well-executed HDR appears natural rather than obviously processed.
Create composites combining multiple frames for ideal conditions—empty streets from long exposures, perfect sky from different time, optimal lighting from another capture. This advanced technique requires careful masking and blending creating seamless results. However, recognize composite work crosses into manipulation rather than photography documentation—maintain clear distinction between straight photography, enhanced photography, and composite artistic creation. Disclose composite work when presenting images in contexts expecting photographic accuracy.
Apply final output sharpening appropriate for intended display medium. Screen display requires less sharpening than prints, while large prints need more than small prints. Use Photoshop’s smart sharpen or third-party plugins (Nik Sharpener Pro) providing output-specific sharpening. This final sharpening differs from capture sharpening applied earlier—capture sharpening recovers detail lost in capture/demosaicing process, while output sharpening optimizes for specific display medium addressing resolution and viewing distance factors.
Black and White Conversion
Consider black and white presentation when color distracts from form, texture, or composition. Convert using black and white adjustment layer in Photoshop or black and white panel in Lightroom rather than simple desaturation which produces flat muddy results. Control individual color channel brightness creating customized tonal rendering—darken blue sky emphasizing cloud drama, lighten stone architecture creating separation, adjust foliage rendering controlling natural element prominence.
Increase contrast in black and white images compensating for color contrast loss—color photographs achieve separation through hue differences while monochrome relies entirely on tonal contrast. Use curves or levels increasing black and white points creating true blacks and whites rather than gray-dominated images lacking punch. However, avoid excessive contrast eliminating midtone detail and creating harsh appearance inappropriate for nuanced architectural subjects.
Add film-like grain creating organic texture and classic photographic character. Use grain tools in Lightroom or Photoshop applying subtle grain particularly in midtones and shadows. Fine grain mimics traditional fine-grain film (Ilford Pan F, Kodak T-Max 100) while coarser grain suggests faster films or vintage photography aesthetic. Grain application proves subjective—some prefer clean modern digital appearance while others appreciate film-like character connecting to photography’s heritage.
Explore split-toning adding subtle color casts to highlights and shadows creating emotional depth while maintaining monochromatic character. Warm highlight tones combined with cool shadows creates dimensional appearance and vintage aesthetic. Selenium or sepia toning evokes traditional darkroom processes. Keep toning subtle—excessive color application defeats monochrome purpose while subtle tones enhance without overpowering black and white foundation.
Frequently Asked Questions About Český Krumlov Photography
Do you need permission to photograph in Český Krumlov?
Personal photography throughout public areas including streets, bridges, exteriors, and viewpoints requires no permission or fees. Commercial photography requiring models, props, or blocking public access may require permits from municipal authorities. Interior photography in museums, churches, and castle tours follows individual venue policies—some prohibit photography entirely, others allow non-flash photography, while some charge photo permits. Always respect posted restrictions and ask permission when uncertain.
Can you use tripods in the historic center?
Tripods work freely in most public areas though some specific locations restrict their use during peak tourist seasons to prevent obstruction. Commercial photography using extensive equipment may require advance permission. Respect other visitors’ access to viewpoints, avoid blocking pathways, and remain aware of tripod creating trip hazards in crowded conditions. Early morning and evening shooting typically encounters fewer restrictions and obstacles than midday peak traffic periods.
What are the best months for photography?
September and October deliver optimal photography conditions combining favorable light, dramatic autumn colors, comfortable temperatures, and reduced crowds. December and January provide winter photography opportunities with snow, Christmas markets, and exceptional low-angle light though limited daylight hours. May offers spring blooms and lengthening days. Each season provides unique opportunities—choose based on preferred aesthetic, weather tolerance, and crowd comfort rather than seeking single “best” period applicable to all photographers.
How long should you spend photographing Český Krumlov?
Serious photography requires minimum 2-3 days covering major locations under varying light conditions and weather. Single day visits capture highlights but miss optimal light opportunities at all locations. Extended stays (4-7 days) enable waiting for ideal conditions, exploring lesser-known areas, and creating comprehensive portfolios. Photography-focused visits benefit from flexibility responding to weather forecasts rather than rigid schedules requiring shooting regardless of conditions.
Are there photography workshops or tours available?
Local photographers offer private photography tours combining location guidance with technical instruction. These experiences cost approximately €40-50 per person for 3-hour sessions focusing on optimal viewpoints, technical settings, and seasonal light utilization. Photography workshops teaching architectural photography, landscape composition, or post-processing techniques operate periodically—check local tourism websites or photography forums for current offerings and schedules.
What accessories are essential for architectural photography?
Sturdy tripod proves essential enabling sharp images at low ISO and small apertures. Remote shutter release or camera timer eliminates vibration. Graduated neutral density filters balance exposure in high dynamic range scenes. Polarizing filter manages reflections and enhances sky contrast. Lens cleaning supplies maintain optical quality in dusty or wet conditions. Extra batteries and memory cards ensure sufficient capacity for extended shooting sessions. Camera bag protecting equipment during transport between locations.
How do weather conditions affect photography opportunities?
Overcast conditions provide even soft lighting ideal for color work and detail photography though lacking dramatic light quality. Rain creates reflective surfaces and moody atmosphere but challenges equipment protection and photographer comfort. Clear sunny days deliver dramatic golden hour and blue hour light though harsh midday conditions. Mixed conditions with passing clouds create dynamic lighting and dramatic skies. Each weather type offers opportunities—successful photography requires adapting to conditions rather than waiting for single ideal situation.
Can you photograph people and street life?
Street photography including people in public spaces remains legal though ethical considerations apply regarding privacy and dignity. Photograph people as environmental elements adding scale and context to architectural subjects rather than primary subjects requiring model releases. Avoid intrusive close-up portraits without permission. Be respectful of local residents going about daily lives versus tourists who may accept photography more readily. When asked to stop photographing individuals, comply courteously respecting their wishes.
What makes Český Krumlov photography unique?
The dramatic river bend creates natural compositional opportunities with water reflections, elevated viewpoints, and three-dimensional architectural relationships impossible in flat medieval towns. Intact Renaissance and Baroque architecture maintains historical authenticity versus reconstructed or heavily restored sites. Compact geographic concentration enables photographing all major subjects within walking distance, unusual for World Heritage sites typically sprawling across large areas. The castle complex’s vertical dimension contrasts horizontal old town creating dynamic compositional variety.
How do you develop a personal photographic style here?
Study existing Český Krumlov photography identifying common approaches, then deliberately create different perspectives. Explore beyond obvious compositions discovering personal vision rather than replicating postcard images. Develop consistent processing aesthetic—color palette, contrast, tonal rendering—creating recognizable stylistic signature. Focus on specific aspects (details versus landscapes, color versus monochrome, classical versus contemporary) rather than comprehensive coverage. Return across multiple visits developing deeper understanding and refined personal interpretation versus superficial touristic documentation.